
After a recent and long overdue refresh and refurb of the house I had a lot of blank walls in the multiple variants of cream/off white/oatmeal that I tend to go with. Rather than just put up the old pictures it gave me the chance to evaluate whether they were worthy of a place. Some have been relegated to the charity shop, others are still being juried and some have been put back up. I will admit to quite a few quilt wallhangings of mine appearing on these blank walls but only my favourites go up, others are taking up cupboard space and may suffer the indignity of becoming a dog cushion for the local dogs home!
But in the family room, which has many uses but is mainly a space for my teens to watch TV, play games and entertain their friends I was struggling to fit in any of our pictures. Originally and pre children with its plate rail and big bay window it had a lovely warm, rather old fashioned feel particularly with an open fire in winter. But this time we wanted a more modern look and shamelessly copied one of the images in the John Lewis catalogue but I presume that is the intention of these stylists to get us to buy! Well they succeeded but the wall art in the picture wouldn’t have worked and I needed something that would tie in these blues, greys and oatmeal colours with the existing red brick fireplace. I thought it would be a wonderful excuse to make a wallhanging with the right colours and at the right size to tie the room together.
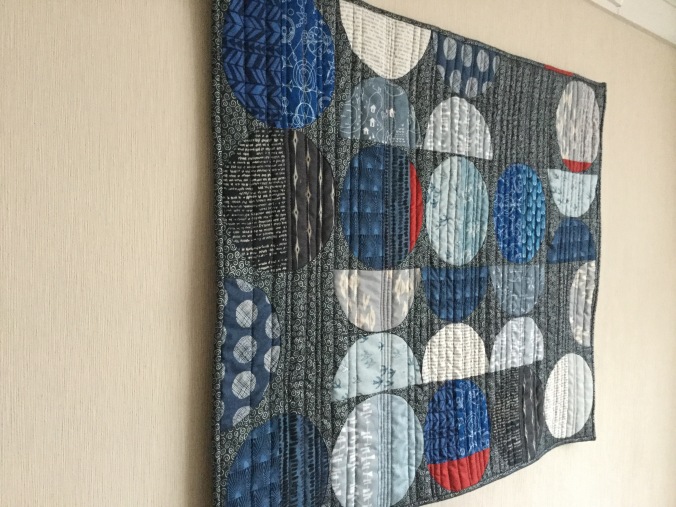
 Picking colours our grey cat Minty got in on the act adding his own tone of grey. Needless to say I had plenty of bluey greys to audition and just the right brick red to go with the fireplace. As to the design I had seen Zen Chic’s latest blue fabric range online and their quilt Bowls to show it off. It was the perfect inspiration but I didn’t want to applique the circles so used the wonderful six minute circle technique. This technique gives you a pretty perfect pieced circle without having to sew a curve in the conventional way. I used the technique to make these recent blocks for a charity quilt.

These come together rather magically with the help of freezer paper, starch and glue. You can of course get the same effect by making 4 drunkard path blocks but the circle is then in quadrants and you have to match seams. This is much quicker and I think more effective.
An excellent tutorial on this technique can be found here.
The quilt was actually a quick if rather messy make but I needed a design wall to play with the blocks. How I’d love to have a permanent design wall but to find the room I’d need to evict a child first so I made do with this improvised one draped over an existing picture.

The quilting is irregularly spaced straight lines using a variety of different threads. I was bold for once and put some red thread in.


I tried a new binding method using four strips instead of one continuous binding strip. I’ve often wondered whether the continuous binding distorts the quilt when you go round the corner. Whilst that’s not a problem for a large quilt because when it’s draped over a bed you’re not going to see the old wave but with a wall hanging I do like them to be flat against the wall. Heidi of Red Letter Quilts mentioned a tutorial she had seen that used four binding strips but would still give you a mitred corner from Linda of Flourishing Palms. I also came across a video tutorial of this technique on the Modern Quilt Guild website. I’m a member so unless you are it may not be accessible but it largely covered the same ground, it’s just good to see some of detail explained. The tutorial is here and having used it I think practice would help make it more perfect but my overall feeling is it does help to ensure a flatter finish because each binding strip is measured precisely against each side of the quilt.
As always I ended up with another whole bunch of scraps from doing this quilt because the circle method means you are cutting out, surprise, surprise circles. Not wishing to put them back into my scrap system and knowing that the room needed cushions I couldn’t resist doing a quick scrap cushion in the same colour way. Rather than piece this into the background it’s appliquéd on which I’m not so sure is as attractive but to make up for that I thought I would pad the circle and I’m afraid it now looks rather like a multicoloured polo mint. But as it will spend much of its life on the floor knowing my children it will have a limited life span…..


I have to say I’m really pleased with the wall hanging and the children are reasonably OK with it although not effusive!! I’m just grateful for all the time I’ve saved trying to find the right artwork to go above the fireplace!!
Linking up with Kelly of My Quilt Infatuation , Anja for TGIFF , Amanda Jean at Crazy Mom Quilts

I love this! It’s modern, the colors are striking, yet muted and it’s perfectly made! Those kids should be happy you didn’t evict them for a design wall, so don’t let them influence your decisions on what goes on the wall! 🙂 I need to change out my wall stuff, too…thanks for the idea!
LikeLike
I love the colors in this quilt. Love your improvised design wall as well. I might have to try that!
LikeLike
It is gorgeous! The perfect compliment to your room.
LikeLike
Love this; it’s fabulous!
LikeLike
Beautiful! Love reading about your process. I have a large blank space staring at me in my family room and although I want to put together a cool photo collage wall, I am tempted to make a wall hanging. Love your fabrics and interesting shapes in this!
LikeLike
Great wall hanging and pillow. I’m sure they’re a great addition to your house. Thanks for linking up with TGIFF hosted @ Anja Quilts.
LikeLike
Pingback: The best of 2016 and what I learnt from the not so best of the year! | The Lilac Cat
Pingback: Another quarter, another Finish a Long (Q2) and One Monthly Goal | The Lilac Cat
Pingback: May’s Goal | The Lilac Cat
I am gobsmacked to read about these circles. And in awe of your over the fireplace quilt. Thrilling in all respects. And I love Minty alongside the fabrics.
LikeLike
Pingback: Finished……thanks to the Duke of Edinburgh | The Lilac Cat
Pingback: A literal learning curve | The Lilac Cat