
I’m a great believer in the drip drip effect. Slowly coming round to an idea and changing your stance as you see more images or hear more ideas that challenge your preconceptions. Medallion quilts are an example for me. These are quilts which are built round a central block. This is an example of Girt by Sea a current Sew Along promoted and designed by a group of very talented Australian quilters/designers. The pattern is available here. It’s very fitting for the UK of course and I was tempted but it would crowd out other things I want to do.

I was also influenced by the fantastic medallion quilts made by Nicky Eglinton. She is a prolific quilter and makes countless quilts for the charity Siblings Together. She has this ability to take orphan blocks that someone else has fallen out of love with and then build a quilt around them. Quite literally. It’s a real gift and one of my favourite quilts from last year was made this way along with many other medallion quilts she has made which are modern, fresh and beautiful.
As usual my quilts are a melding together of ideas from other quilts and designers. I love this quilt made from scraps by Katie Pederson and whilst I thought I’d do a straight copy it struck me I could just extend one of the squares and make it into a medallion. In fact Katie has done a whole load of variations with these blocks.
On one level it’s a very simple quilt in that it is made up of only these two blocks. These are very easily and quickly put together with chain piecing and absolutely perfect for scraps. My scrap jars are positively roomy as a result! These come out at unfinished 4″.

The clever bit is Katie’s placement which if I’m honest I found very difficult and I had to keep constantly referring to her quilt. Being on point didn’t help. Most quilts are made from smaller blocks which you then make into a bigger block and then piece together. This became one organic whole. I couldn’t get my head around breaking into into bigger sized blocks. Presumably it’s circular medallion nature didn’t help.
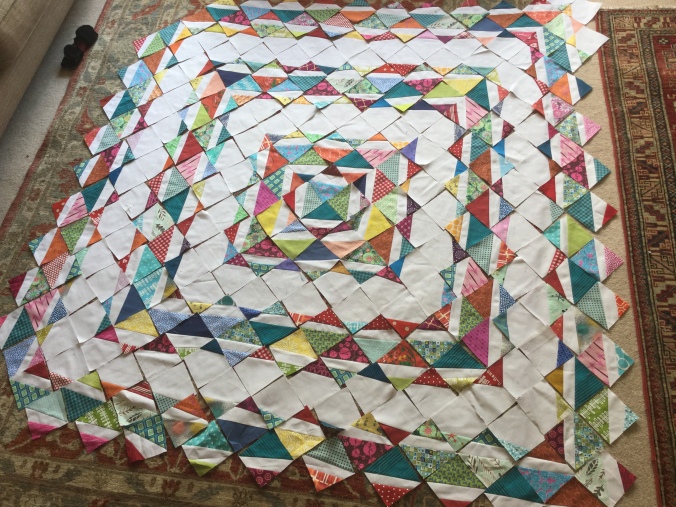
The problem then came with construction. It took an age to layout and with cat and children banned from entering (I had to relent in respect of the children as the television is in that room) I had to construct it as quickly as I could. There are some 300+ pieces in this quilt and it took a couple of days but it was so worth it and I love the finished result. All down to that simple but tricksy layout and I think the medallion style works very well. One thing that surprised me was how much background fabric was needed – at least 3m. It’s all those seams!

There’s an error in this quilt. A number of IG friends said to leave it but I just couldn’t….
But with the top finished I made a complete hash of the basting. Ridiculous really as it’s not that big and as a medallion quilt you know where the centre is. As this blog is my go to reference I’ve listed below what I should do next time to avoid such a waste of time. So feel free to skip if this degree of detail is not your thing or you are a world class baster!! Mind you one thing I learnt thank heavens for spray basting. My quilt teacher was very anti this way of basting partly because it can leave a sticky residue (in my house that’s nothing unusual) and secondly the fumes can trouble those with chest/ asthmatic conditions. There’s not much wrong with my chest and using spray glue it meant that for the numerous times I had to re-baste it I could just peel the top off and re- place it. If I’d had used pins, Dear Reader, things would have got very fraught. So my to do list for next time.
1. Exactly halve the backing fabric by hanging it over the bannisters and do not just second guess where the middle is. (I use a 4m length of fabric which I then halve and resew to get the necessary width – this is a good length for the 65-75″ edge quilt size I tend to make)
2 Trim the backing so it has a straight edge
3. Measure the top and make sure you have the right size batting. Such an obvious point but so tempting to wing it.
4. Always baste backing to batting first. Do not trim at that stage
5. Then place top on top of batting and backing to complete the sandwich. Before trimming carefully check by going round every edge to make sure the backing and batting are extending beyond the top. Then trim.
I’m undecided where this quilt is destined. I’ve promised a friend’s daughter a quilt but not sure it’s girly enough for a 6 year old. Alternatively it may live here for the many teenagers that end up here for sleepovers.

Linking up with Kelly at My Quilt Infatuation, Amanda Jean at Crazy Mom Quilts and Leanne at the Devoted Quilter for TGIFF

I love this quilt. It is exciting to see the parts separately and the. Joined together to provide such a wonderful spectacle. Personally I love all the white fabric which allows the colours to breathe (compared to the organs one you linked to which just made me feel stressed!). Thank you for the opinion on spray basting. Sounds very useful. And I love the funny point about sticky residue – our floor seems to be covered in the stuff.
LikeLike
It may be simple with only two blocks, but it is gorgeous! I love the scrappy scraps against all that white! It’s very effective!
LikeLike
It’s gorgeous!! I can see how it would have been a bit difficult to wrap your mind around piecing all those small blocks together, but it certainly worked out in the end 🙂
LikeLike
Wow that is so pretty. I’ve resisted medallion quilts because my linear brain has a hard time adjusting to that kind of layout, but yours really makes me want to do one.
LikeLike
Popped by from Finish it Up Friday. Found your error in the image – I would have fixed that one too since it was on a border.
I use spray basting for small projects but for the bigger ones it gives me fits, puckers appear out of nowhere. The big bed quilts get basted – whether they like it or not! *grins*
http://thriftshopcommando.blogspot.com
LikeLike
Oh that is just gorgeous!! I love the pattern and I can completely understand kicking everyone out of the room to get the layout just right – it was clearly well worth it!
LikeLike
Pingback: May’s Goal | The Lilac Cat
Thanks Jen for the wonderful compliments and I love your medallion quilt. It is a real beauty. Hope you make a few more. Thanks for linking up to #scraptastictuesday!
LikeLike
Love the effect of this simple blocks. Maybe trying it with fading colors?? In any case: love it!
LikeLike
Such a pretty scrappy medallion! Love it!
LikeLike
It’s a fantastic quilt – beautiful!
LikeLike
I am so sorry that I am late to this medallion party but I am so glad I made it here. Thank you for sharing all the frustrations with the quilt and the layout. They make it all the more beautiful. Someday, I will gather enough courage to attempt the medallion. It is gorgeous. Visiting from Scraptastic Tuesday.
LikeLike
Pingback: 2017 review of highs and lows and a look at 2018. | The Lilac Cat