Strings for fun – May block for Siblings Together Bee 2

5201F2E6-CD23-4C37-A018-57528D851D56

Voila! The block for Siblings Together Bee 2. Don’t be confused by instructions for another block for this month on this blog. With immaculate timing I’m monthly Mama for two ST bees this month! As far as I’m concerned double the happy mail.

When I’m thinking about which block to use for these Bees  it’s often prompted by what scraps I have. I love scrappy quilts and there’s nothing like a Bee to really multiply the number of different fabrics in a project.

FB35C210-50BF-4BDE-942C-0F31B5422D78

Probably the most common type of scrap I’ve got are strings, those long pieces left after a block has been cut. Or  corner pieces when you’ve snowballed a corner. Well now they can shine!! Here are the instructions.

I would like you to make 4 times 8.5” unfinished square string blocks that then get sewn together as the block at the top. It does require piecing onto a foundation of paper.**

** That’s a lie! It’s slightly easier if you have a foundation to guide you when sewing but actually if you’ve got a good eye then it’s not necessary. I know how many of you in this Bee are expert quilters albeit not me! Most of the test blocks I did were without a foundation.  If however you want to have a foundation but this is new to you then the trick is to use a much shorter stitch length say 1.5 which makes it easier to rip out the paper  and just follow along with the pictures  When I first did piecing with paper foundation I thought it would damage the needle but it won’t although it may blunt it quicker. Any problems get in touch

You will need

2 x 10” by 10” squares of bright white solid OR 2 x 9” by 9” squares of bright white solid if you are not using foundation or if you’ve paper big enough to accommodate cutting out a 9” square.(A4 isn’t big enough)

4 x 1.25” by 14” strip of very dark fabric, it can be dark navy, black, dark red, dark grey etc, preferably a solid or reads as a solid. You can use different dark fabric in each of the hst as I’ve done

Other strings, any colour including paler/neutral fabrics and  cut to various lengths and width anything between 1.5” and 2.5”

Thin paper, ordinary photocopying paper is fine, for the paper foundation.

1. Cut each white 10” (or 9”) square in half along the diagonal  making 4 right angle triangles

2. Now prep your paper foundation if using paper. If you’ve paper big enough just cut out 4 times 9”  squares.  If you haven’t then you can just about squeeze out a 9” half square triangle albeit with a missing corner from an A4 piece of paper! With your A4 paper on the cutting mat place the diagonal of a quilters square ruler along the edge and cut from the right hand corner. I keep a rotary cutter with an old blade in it for cutting paper.

6414B672-A4CC-45AB-9E6E-F6560E04BD8E

3. Flip it over and then mark 9” up the side.  Now with the quilters square ruler so that again the diagonal is on the long length  you can cut up to the 9” mark and making a right angle at that point. If you were wishing you’d paid more attention in your maths class hopefully the picture  should help!

7A70775C-3500-4AA0-AB58-9DAD11AEC6540720E2BB-6081-42D4-AF54-3D9A8F4C9E35

4. Your foundation paper should now look like this. In effect half a 9” square with a small corner missing. Ideally the corner wouldn’t be missing but it doesn’t matter when we get down to sewing. You will need 4 of these.  Put them aside.

7595C9ED-CF00-4E46-8D98-0FC784A2837B

5. Now sew the dark string to the longest side of your white triangle piece. Scant 1/4”is fine

64789805-75C5-46E4-B7DE-70025583F73E

AD867B28-46C2-44E0-BF83-A9B22105D930

6. Now iron back the dark strip with the seam to the dark side as below admiring my scorched marked mat as you go

E7E8B67B-E407-4D35-B9E0-5EBF241ECA8E

7.  If using paper flip over the fabric to the wrong side and put a few spots of fabric glue along the length of the dark string and then attach the paper triangle tucking it under the seam. Remember it’s missing a corner so make allowances for that. If you have a 9” square of paper again attach with a spot of glue.

The reverse should look like this…

DDBE5EDA-5970-4D16-9CAF-C815C8734C42

And the front like this

739DBCFC-1167-4751-AF2A-335EB69BF0AD

8. Adjust your stitch length. With the right side up sew a string the length of the dark string using 1/4” seam. You will be sewing through two fabrics and the paper if you’ve used paper

421D8BAD-7D42-4D94-8D75-32474FB84C5E

9. Then keep adding strings as you go until the paper foundation has been covered or if without foundation paper by eye. You can iron each seam as go or finger press.

E5EE6B61-8644-4385-85EA-8BE094B11F56

10. If using paper now remove the paper

D0A119D2-07FD-4719-B70A-4253D9BA06C1

11. Now iron the block then trim using your quilters square ruler to make an 8.5” by 8.5” square. Again use the diagonal line on the quilters square to ensure that dark strip is corner to corner

3B3C0363-F056-45FF-9436-8E8A2CBCFEE5


6. When you’ve finished your block should look something like this

1111847B-6C89-43C9-AAAA-8548F4635591.jpeg

13.  Now sew the 4 blocks together as above remembering to alter the stitch length back to normal. I also suggest you press the seams open when joining the 4 blocks together  to reduce bulk

If you want to make more then that would be wonderful but please leave them  as single blocks


Bee valued… May block for Siblings Together Bee 4


5812ED11-E4C0-4EA2-AA8D-E3677EC2CF25

Karen Lewis of Blueberry Park fame showed on her IG feed a few weeks back a stunning design from a book called Wise Craft Quilts by Blair Stocker. It was a scrappy quilt but using different values  of fabrics made for a striking design. Because it’s in a book  we can’t really use it for a collective quilt but I noticed Blair had a free pattern on her blog using a slightly simpler design but using values to make the design stand out. Blair used Outback Wife from Gertrude Made for her quilt so it is quite possibly  the most expensive quilt on the planet and as an aside, as it’s quite a scratchy fabric, it won’t be the most soft and cosy either! Anyway this design is perfect for using up scraps and any left over 5” charm squares. And to make life even  more pleasant it’s just simple HSTs. What’s not to like ….so what’s needed

The trick with this block is getting the values right. As I’m after a quilt for a boy I’d like non floral blues and greens as the main colours and lighter patterned non floral fabric which don’t have to have green or blue  but can be. So I picked out scraps/charm squares in both categories.  To determine value and get a nice blend the best of way of doing that is to take a quick photo then put it into monochrome. You can also use a red plastic see through filter that you can buy. I do have one but where it is is a completely different matter as the photo trick is so easy

Here’s the colour version of my scraps

E5D5E743-E44D-4D95-8363-EA601787C28C

And then the monochrome version.

A3E35BCC-2029-406A-B84F-CFE8C5035B3C


I then took away those two spotty and striped fabrics in the middle and swapped out a couple of coloured fabrics because they weren’t dark enough.

You then need  to cut out 8 x 5” by 5”  squares of ideally 8 different darker/medium value fabrics in blues and/or greens and 8 x 5” by 5” squares of ideally 8 different patterned neutrals/lighter fabric. (If you are struggling to find enough different fabrics don’t worry, life goes on!). Please don’t use solid white, cream, light grey etc as we are not looking for stark contrast but a more subtle contrast. So as you can see from my example I’ve used patterned lighter fabric in a variety of colours.

22223E51-9496-4D76-8738-FB682769E0C2

Using one darker square paired with a lighter square and a scant 1/4” seam make half square triangles using your favourite method. Following a tip from Nicky Eglington  I iron each pale fabric down the diagonal corner to corner and use that as my guide to sew either side. But equally you can draw a line corner to corner. Then sew a line a scant 1/4” either side.  Please trim the HSTs to 4.5” square then assemble as the finished block above and below. Can you please make one block. Please trim to 16.5” square

7F2700E6-98C0-4F10-AEAF-A175991E009E

Please feel free to use fabric that is predominantly blue/green (any shade from lime to turquoise) but non floral please. In mine there’s a jaunty Kaffe Fasset fabric that is predominantly lime green but has other colours. That’s fine as long as it’s not floral. I’m saying that motif on that fabric isn’t a flower but just a shape!! You can if you wish, and you have enough scraps, have an all blue or all green version or mix it up as I’ve done.

If you are still struggling and I do appreciate that the non floral is a limitation then please do not hesitate to ask me to send some suitable fabrics. I’m really very happy to send you fabric. Just ask.


The Suburban Quilt


3210568B-A551-4A9E-B31A-E131C1E3FD7D

As I was pulling together this quilt with blocks made from the lovely members of the Siblings Together Thread House Retreat Bee (there’s a mouthful for you!) I had a crisis of confidence. It wasn’t because of the quality of blocks or the colour blend was wrong etc, they were all beautifully done, it just struck me that a quilt of houses, which to most signify home, won’t necessarily have the same warm connotations it has for most of us.  Indeed the very fact the child is at one of the ST camps is because of a breakdown in their original home setting necessitating going into care and then worse having had to be parted from their siblings. It’s hard to imagine the lead up and great distress of all the circumstances that result in a child being taken into care for those, like me and my children, who have been blessed with a very happy and secure home. Home for at least some of these children definitely won’t have the solid sense of security and refuge it does for most of us.

But on reflection I hope that the children are in a caring foster home environment where they’ve been able to build meaningful relationships and home is now associated with loving care and being looked after and supported. As for multiple houses, in this crowded country, the vast majority will be in domestic settings where houses are close together so that aspect of the quilt will be familiar.

81C5E1CC-110C-48EE-8621-A76DE250372C

The other aspect which gave me comfort is how quilts are matched to the child on these camps.  It’s not a scrummage where the children are let lose to pick their favourite. Which is just as well as it was this approach we had for a Fat Quarter swap  we had on the first Thread House Retreat. Everyone put a FQ of fabric they’d brought from home on a table and on the word go you grabbed which ever FQ you fancied.  Well quilters are lovely people but shall we say you do not want to stand between a bunch of them and that one stunning Carolyn Friedlander piece of fabric. …. a stampede comes to mind. Wisely that event was dropped on this year’s retreat.

The approach taken is that each child’s camp mentor, presumably armed with the broad likes and dislikes from the child but crucially an understanding of the child, makes the selection.  I think that’s a super way, it’s more personal and fitting. For that reason you can see why you want a selection of quilts.

The inspiration for this quilt is set out in this post. That original quilt was clever in that it had quite a bit of blank space and low volume houses to give it depth  and somewhere to rest your eye. So each block of 12 squares was to contain a minimum of 2 blank squares.  My Bee members are obviously an industrious lot as none contained more than 2 and I needed to intersperse a few extra rows with more blanks to get the balance right.

Other than asking my Bee members to build in (pun eh?) fabrics of different values, the colour and design was up to them. There were some fun choices….

9B0D0CDD-5683-4C87-9A74-1227F764B3EFF1230125-2BE7-4358-9DF1-5C8057611B70224B7AC2-B296-4DEE-B16C-986CC290C8E7149D03B8-A3E8-40F0-84A9-609AE28DC634

In terms of quilting I just went with the simplest of straight lines…..rather than stitch in the ditch, just two lines either side of seams. I chose to bring down the big quilting machine to the warm lounge, as our cold wet spring continues, and using an adjacent small cupboard  to carry the weight of the quilt in effect with the quilt in place I made a tent. The cats had great fun playing hide and seek with each other but just like siblings sometimes the fun ends in a fight!!

86002B55-652B-4F6F-94F9-22B5F98277E36A6F6A1E-C1FC-46A3-9709-6CCD89148890

I’m hoping it will go to the right young person for whom houses and home are comfort givers.

Linking up with a Kelly of My Quilt Infatuation and Amanda Jean Crazy Mom Quilts

This is a Q2 QAL finish and covered here 


Bags of inspiration

.78F911D5-F537-48F6-A906-300031C3FE23

An IG  post from Poppy of Cuckoo Blue got me rushing to copy her latest creation…..again. This happens all too often. Mind you she’d say she got the idea and pattern from Amanda Jean of Crazy Mom Quilts. So this inspiration thing is definitely very circular.  But once I saw her fantastic super sized scrappy tote bag I knew it was the perfect idea for thinning out my blue drawer of scraps. I liked the way Poppy had used scraps but the base was a solid fabric. The combination of a riot of colour and a neutral works for  me.

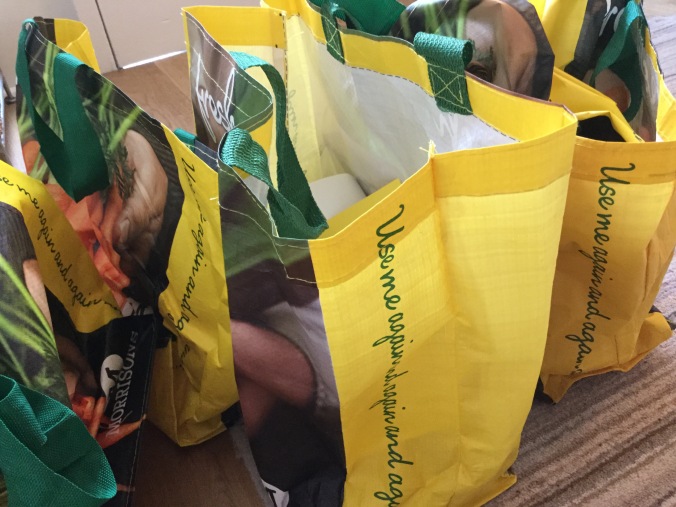
I’m forever needing shopping bags to replace these, albeit useful, but very ugly plastic bags so I was off to raid my scraps .

F1359B87-9CAC-4558-B7B9-650F2CDFA87C

And I’m also forever needing to use scraps so the drawers of my scrap filing cabinet don’t explode!

9E4579F0-8D50-4A4C-AD04-304D6BDA1FDD

I knew it would be productive as at least one in every two quilts I make is a blue/green colour.

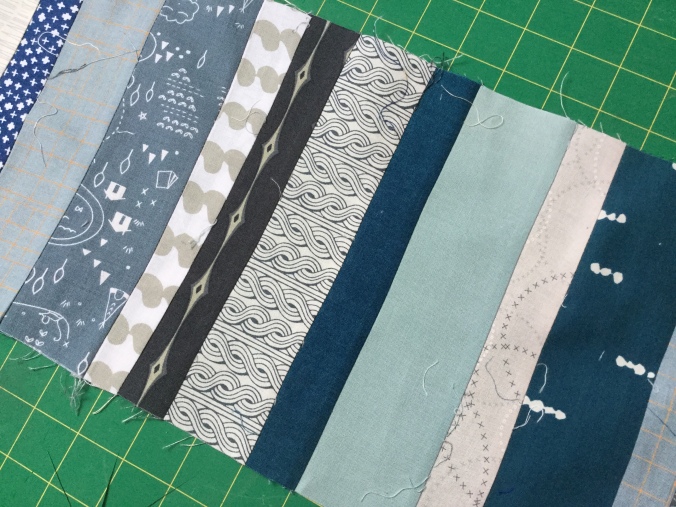
I had a very enjoyable afternoon sewing them together and making pretty, wonky strips of blue and green scraps. It’s so freeing not to have to worry about the lack of straight lines or properly sewing and ironing seams other than the basics to make sure they don’t come apart  and just revel in bonus fabric. Of course it helps that the final product was for me.

E06E8DB0-2E83-40FE-8AA5-FBEBCBC75078

Well after my foray into the world of manmade fabrics on last week’s post  I had some interesting comments. For me,  everyone has to plough their own furrow, but to summarise mixing in polycotton with cotton is risky say in a block but as a backing it seems very practical. It’s Kate’s backing of choice often using polycotton sheets for their cosiness and I can see myself on occasions going in that direction. She’d even, at the time of writing, while visiting family saw the 20 year old quilt she’d made them, yes with a polycotton backing, looking as beautiful as ever.

The Joyful Quilter was not a fan and reminded me that polycotton can more easily burn and distort when ironed as did Linda and Donna. A very valid point. And that brings to mind yet another point of great unfairness between US and UK based sewists – not only is your fabric so reasonably priced but your irons get hot, I mean really hot.

On a recent holiday to Colorado I used the iron to set some seams on some hand sewn blocks  I’d done on the plane (much to the intense embarrassment of my children)

image

and wow was it a dream to do them with a seriously hot  iron. To the point you had to be careful you didn’t singe it. In this country you would have to leave the iron in place for some time for that to happen on cotton. There will be some regulation somewhere in our very protective culture limiting the temperature setting of irons so they are not too hot for safety reasons. Mindyou that protective attitude may well have saved my forgetful self from burning our house down so I’m not complaining too loudly!

Anyway back to exploring man made fabrics, I’ve crossed another bridge with these bags. In using home dec fabric and of course with the interfacing there’s a fair bit of man made fabric in these bags anyway but  I’ve stuck to leather handles.  But they are so darn expensive. The leather handles on this tote I made earlier this year comes in at £18 a pair!

8A99FD72-F8D2-4A51-A785-10AF6B6CAC37

I have bought some cheaper leather straps but well, they look cheaper and even then they are £6 a pair for shorter handles. I’ve also bought pre made  leather straps for bags but again at £5 a throw. I’m lucky not to have to be too worried about sewing on a strict budget but then again who doesn’t like a cheaper but as effective option?

So I thought I’d try webbing  type straps and ordered from eBay 5 metres of webbing but too late realised they were made from polypropylene. At £2.50 I didn’t beat myself up too much! I was expecting plastic straps but when they arrived they actually looked and felt quite good. So doubling them up for more structure, though I don’t know in reality whether that’s needed, I sewed them so they have a rounded look and used them on these two scrappy bags.

DE584744-2374-4443-AE10-06A1084C44D9

B7F9F09D-6A30-4EA4-97F5-2ED1F1DA5C5C

Please admire the grease stains on my bargain £50 oak table which won’t wash out. It urgently needs a re varnish …..

I think they work really effectively  and I shall be switching to these except for gifted bags. It just goes to show how the wrong order can become the right one.

I used the tote tutorial I did here but I’m afraid when I came to use it I didn’t find it very clear! I needed to make it easier to determine the sizes of the outer fabric and the inner lining fabric pieces. I’ve updated it now if you fancy having a go.

I do love using these  bags. I want a car boot-full of them so I never have to buy a plastic carrier bag again and in this anti-plastic era for once I would be doing the right thing!


Recap of FAL for Q1 and plans for Q2

Not a whole of lot of progress I’m afraid on the Finish Along targets for Q1.  Only 2 out of 7 as the photo composite shows.

E39DDDC7-CA02-42FE-99A2-B29B40B8EC6C

The dotted tick is to represent a quilt finished just the wrong side of the quarter. But the key word is it is finished. But my successes were as follows

1. The triple pouch

C4BCE8D7-D159-4DDF-877E-A6BBEA7EE415


2. The medallion quilt

D63962AE-5D55-4AB0-A84C-6B57C8A998F8

Frankly I found the triple pouch a pain but I was really pleased by the medallion quilt. Virtually all scraps apart from the white; I think there will be more medallions in my future.

I’m not going to be too harsh with myself as there were quite a few makes finished in the last 3 months, it’s just they weren’t even a twinkle in my eye at the beginning of the quarter so don’t count.

So to my next set of finishes for next quarter I have thrown in the kitchen sink…..everything that is most definitely a twinkle in my eye!


E43E41DB-8BB9-4B4C-994D-92CBAFDD5C70.jpeg


1. Another clever design from Aneela Hoey called the booklet pouch

2. A quilt made from house blocks, in theory should be an easy finish10. Another log cabin quilt from extra blocks from Siblings Together Bee 2

3. A quilt made using left over strips from a quilt made back last year. In fact I be just finished this one  ahead already!

4. Another tote bag, started inspired by the lovely Poppy’s @cuckooblue new scrappy tote and yet another tote bag for the Chernobyl visit from children from that region.

5. A baby girl quilt for a friend’s first granddaughter, after having sins and grandson I’m going for pink for this first girl

6. A quilt from left over extra blocks this time from the Siblings Together Thread House Retreat Bee

7. New York Beauty quilt. I’d love to think this would be finished but frankly there’s a lot to do and they are slow blocks

8. This might go to Festival of Quilts. It’s a modern version of the classic Robbing Peter to pay Paul

9. Maybe another challenge quilt for the Modern Quilt zgroup f the Quiltets Guild on the theme fooling the eye. Just some test blocks

10. Yet another quilt from extra blocks made by very generous Bee members

Using up scraps….and a confession

3349461F-0AC7-413D-86E3-2980A0CCF843


Shall we start with the confession? I’m sure you’re wondering how wicked I’ve been. Well it’s on the back of the quilt above. Yes a polycotton backing! I hadn’t realised when I bought the fabric online but once I dug it out the drawer I realised my mistake.


DB12C8B1-A515-44D2-9F47-A89357B49286

As an aside yes the grass looks grim and if and when the relentless rain in this horrible cold spring we are having let’s up I will get it done

Polycotton is a divisive topic for quilters with many spurning the use of this fabric for their quilts insisting on pure cotton. Our Siblings Together Bee Quilts guidance notes (or rules!) specify that the fabric used must be good quality quilting cotton but nevertheless sometimes polycotton appears. Some mamas will unpick and resew. Would it surprise you to know I just turn a blind eye!! Although I think whatever the mama specifies then that is what she should be sent be it colour choice or type of fabric  but when it comes to your own quilts well clearly it’s up to you. However I have a feeling that because of inexperience I bought some similar fabric from the Fabric Guild which I’ve used up now but with the benefit of hindsight think was the outlawed polycotton. Sorry mamas if it ended up in your blocks….

Even for cotton purists not all cotton is made equal. There is some horrid stuff out there. I bought a couple of metres of  John Louden Christmas fabric, it was cheap at c£8 per metre, but it was also scratchy and generally unpleasant to the touch. I used it for Christmas sacks so it really didn’t matter.

4911791D-6DE7-49BB-A771-6D9641C0AC2B

But as I smooth down the soft and comfortable fabric of my scrappy quilt which is currently draped over me keeping off the chills of a very cold spring, I’m grateful for the quality cotton fabrics from manufacturers such as Moda, RJ Kaufman and AGF. I certainly would not want to use those particular John Louden fabrics for a quilt. The same goes for those starchy rough fat quarter fabrics you see at Hobbycraft. I know, you are saying you pay for what you get and while that’s true I’d rather the relatively cheap soft silky polycotton than the rough and scratchy cotton. Quite the fabric snob aren’t I?

But for all the derision that polycotton incites perhaps not all polycotton is created equally either and the better quality has its place. The fabric for this backing is soft and silky to touch, a bit like an Art Gallery Fabric, it needed next to no ironing and generally behaved itself when basted and sewn. It’s Rose and Hubble fabric  which I believe is quite a good brand. I’d cheerfully use it again and it was a bargain from the Fabric Guild. In fact the feel of it is warmer and cosier than the conventional quilting cotton backed quilts that are piling up waiting to be sent to Siblings Together.

I think the bad reputation is the mixed use of polycotton and cotton in a block; with the former not shrinking as much as the cotton and potentially distorting the block when washed. But as a backing fabric, particularly with the wadding I use being an 80/20 Cotton poly mix from Hobbs, I’m not sure it’s going to be a problem. I must experiment and see whether distortion in a mixed block causes me a problem.

Back to the quilt this was such a quick make I’m almost embarrassed  to show it! After making this quilt with my mum we had a whole load of scrap strips left over. I must have forgotten that with two of us sewing we would make twice as much. I thought it would be effective paired up with white in half square triangles.

0B1AE248-BDA9-4995-AA4A-0D49EAA9FD93

These were sooo easy. I simply trimmed the blue strips into 8.5” wide strips and which were about 35” long , added a 8.5” white strip on top the same length and then sewed up both pieces along the long sides. Then using a square ruler lined it up on the sewn edge I just cut out triangles which came out as 10” half square triangles. All very effective and all very easy.

91EFE562-3EE4-479E-BE03-F78FEF6A88053741C51E-F2A2-4B72-BE54-D3D0D63D7C18C6C72E85-7AEE-458D-A462-46720FEA55C21D98D108-A9E1-4A1C-97E2-8A37239D2937

Then laid it out in a design as a straight copy from one on Pinterest and sewed it up.

6E8A59BF-FD3B-45CE-8B8B-2B0E5EDE3B1A

I had basting help from my daughter which made it so much easier. I must involve her more often. My wicked backing behaved perfectly, to be fair it’s not a huge quilt at c70” by 60”. Then for some simple straight line quilting. This is a quilt that could be good for a boy/young man and I decided curvy free motion quilting wasn’t right. It called out for lines echoing the diamond shape. This  will be heading off to Siblings Together in the summer. There’s more about this wonderful charity in the tab at the top

AEA5A15D-9BEC-459C-901A-EB1703A44D21

I will wash the quilt and see whether the uneven shrinkage of cotton front versus polycotton back adversely effects it. Assuming not I’m keeping to my wicked ways….. in the meantime I’d be interested in your views on polycotton – in or out?

Linking up with Kelly at My Quilt Infatuation and Amanda Jean of Crazy Mom Quilts

This is a Q2 QAL finish and covered here 

Flying Geese Quilt – my oldest work in progress


CAB15DF3-4BD7-4CAD-AF89-C2151F6DCB17

I really don’t know why this quilt took so long to finish off. This has been patiently waiting well over 3 years and it’s been in my Finish Along list sooo many times.  It is exactly the sort of project where a self induced deadline can help to take you past the finish line, but sadly not in my case

It’s  a quilt design by Emily Blunt from the magazine Quilt Now which seemed simple and quick. I liked the colour choices although of course you could do it any colour combo. I was new to quilting and wanting to have a go at making flying geese. I vaguely remember quite a production line. There are some 80 plus geese here all needing sewing and trimming. I tried a couple of methods of making them but much preferred the ‘two at a time no waste method’. It was also the first occasion I felt I needed distraction for the more boring elements and I tried and failed to watch tv on my small ipad.

Do you indulge in TV while sewing or have other distractions? I have to say I’ve seen many a sewing set up on the Internet/IG with big screens on adjacent walls and Netflix is the companion of choice. I was always impressed that people could quilt and watch TV. Here I envy knitters or those that crochet who seem to be able to do that with minimal need to check what they are doing. And yes there are hand sewn projects but the close work and then distant viewing doesn’t work for me and my eyesite. But  now I’ve a small sewing table in the lounge and a warm log burner I’m reluctant to leave, particularly with the cold winter we’ve had, I have acquired the  skill of just about keeping up with a programme whilst machine sewing.

4BA319B4-8CFD-47E1-9BA7-51374B7737F6

I’ve found that I have to be picky about what I watch and certain very fast paced or wordy programmes are out, but some have worked for me.

A number of friends had recommended the TV drama Homeland now on Netflix. Frankly an American spy drama didn’t appeal when it first came round and there were now 72 episodes all the best part of 1 hour to watch –  nearly two full working weeks! So I’d never had the energy or time but now I could multi task then I didn’t feel it was too much of an indulgence and significant progress on a number of sewing projects was made.

For those of you who have seen it is a very engaging and well written drama. There are lots of scenes where nothing crucial happens so you don’t have to watch continuously.  There is some fast paced action occasionally  (lots of bombs go off) and some twists and shocks but they could be replayed. OK I’ve found spying to be yet another career I wouldn’t want my children to pursue and so avoid the constant threat of imminent death!

Another enjoyable drama series which is also quite slow moving  is The Crown, a drama about the early years of Queen Elizabeth II’s reign. At least with  this one I’m familiar with the characters and have a vague sense of the plot line!  So with this new skill and thanks to multi tasking not only can I enjoy sewing but at the same time get an entertaining insight into the murky world of gathering intelligence and royalty!

Distraction was useful as constructing the top was a surprising lengthy process. The pattern rather peters out at this point. You are shown the picture of the finished quilt and told how to make the flying geese and then you improv piece the whole quilt top connecting up the columns of geese. No measurements were given and I suspect that’s what put me off at that stage of my quilting journey.

Without a design wall this took up a lot of floor space along with the ironing  board, the sewing table and cutting mat the lounge was pretty much out of action and yes I had moans from my teen residents…… Before you feel too sorry for them, they have their own lounge with a better TV and an xbox (I think)/ computer etc but what you can’t have is of course exactly what you want!

It did get finished but next time if I do something like this again I think I will draw it out on graph paper so I have the measurements and can play with placement. I think it would have saved time. It didn’t help that  as I was running out of the background pieces I had to carefully cut each one quite precisely so I didn’t get waste.

AAF176A2-FEF8-4836-A24B-900CF92027DD

Well with the top done it was time to think about quilting. I settled for straight line quilting following the outline of the staggered columns.  It was reasonably quick and straightforward. I liked the flash of colour on the binding but it’s mostly white. I’m not sure white binding is a practical choice for a child/teen bedroom but it looks good!

D8A344A2-2225-4603-8BFA-9AA0D092D130

Linking up with Lorna of Sew Fresh Quilts and Kelly at My Quilt Infatuation