Siblings Together – The Thread House Retreat Bee February block


686F8803-67CE-4106-9F42-02F94A55DF3B

I’m always on the look out for suitable quilts for Siblings Together. Something reasonably straightforward, colourful and preferably using scraps. I came across a quilt which was made for the charity Do. Good. Stitches. If I were cleverer I’d link it but it’s on Flickr and we’ve always had an uneasy relationship…. And then as if to confirm my choice a very similar quilt appeared on the ModaBakingShop.

Both are made up of house blocks but with good use of negative space and different values. The mama for the flickr quilt was The Hoffmeister and I can’t find him or her anywhere! And the designer of the other quilt was Debbie from Esche House. I have at least two of her designs and have yet to make up either. Anyway inspired by these designers  this is our quilt block for February.

Now I’d like each Bee member please to make one 4 by 3 block as the above picture made up of a number of houses and 1 or 2 white squares. If you are keen feel free to make more extra single houses which would mean I could add a row.

To make this block the trick is getting a good range of fabric values. They give depth I think.  So when choosing your fabric/scraps can I suggest that you lump them into low value, medium value and dark value  as I’ve done below. Go for a good mix of colours as well as value


Doing a quick picture edit and making the picture black and white will help as well.

From your three piles choose 2 or 3 low value fabrics, 3 or 4 from each of the medium and dark value piles and then depending how many you’ve selected from these piles then 1 or 2 plain bright white. You need to have 12 squares including the white.  That should mix it up nicely and give the block good variety.

So to the houses.

Cut out 5.5” squares  of all your chosen fabrics including the white.  You should have 12 squares. Set aside the white one(s).

For each coloured square you need a 3.5” by 4.5” white rectangle cut in two for the roof. This should be from the same bright white solid you are using for the 1 or 2 white squares.

F87F5819-78DD-4010-9A0C-F51227662ED0

Now either finger press or mark with an erasable  marker pen  the mid point on the top of your square and 1/4” either side.

B014E747-8588-4BC7-9728-406080E8D4AAPlace your white triangle as in the picture below with the shortest side of the white triangle at the bottom. The top being at the 1/4”mark and the bottom corner 2” down one side. Feel free to eye ball this rather than mark. I placed the coloured square and white triangle on my cutting mat as you can see so measuring the 2” was easy. See below

A45E7C0B-651D-4E3E-984B-6D2FFD74C576

Now sew the white triangle corner to corner using a scant 1/4” seam so that you can then flip back the white triangle to make half the roof.

E9D1F5DC-5FEC-4C56-8D3D-FDA162E6429034F2C3CF-61D9-4432-AA79-E2EE8200E89B

Trim corner off and trim block. Now mark the centre again and 1/4”mark from right of centre (or eyeball it). In the picture below you can see how to place the second white triangle. Again 2” down from the top on the left hand side  with the top corner just at the 1/4” mark.

6CCBC719-737C-4455-94AD-B8DD490645CD


Sew corner to corner and flip and press white triangles to make roof. Cut off surplus  fabric from behind

37C232FE-12BB-4A8B-83DD-12BDD6374846E71CA974-7623-493D-9877-A109864A175C

Trim back the white so that the square is 5.5” and you’ve got one house. And yes that left hand roof looks as it’s sloping more than the other but a quick check will see it’s an optical illusion because you can see the whole seam

2607B509-F703-4C77-8C65-E8D1BC4B9C1D


Then once you have all your houses put them into a 4 by 3 block as the picture below mixing in the white plain squares and all the houses in any way pleasing to you.

551DE211-0418-426E-9888-2578CAA33103

The finished block should be 20.5” by  15.5”. Mine was wildly out because I made this block when I was getting used to a new machine…… This beautiful Singer Featherweight  66 years young . But I need to master an accurate seam. But the beauty of this block it is easy to trim to size.

2222DB6B-996B-4443-97D7-2A371CBE2611Hope that’s clear but any problems do get back to me.

Medallion quilt

D63962AE-5D55-4AB0-A84C-6B57C8A998F8Maths is not a popular subject in my house. None of my children enjoy it and maths teaching is very variable to put it mildly. We were ecstatic if not surprised when no. 1 son passed his maths GCSE but the twins are still going through the grind of learning what they need to to get this qualification . The most common complaint is they can never imagine an occasion in their future when they are going to need to use geometry, solving simultaneous equations, trigonometry  etc etc.  Well I can now say that in the highly unlikely circumstance of them having to design a medallion quilt then their maths could eventually be of use to them.

I had four blocks too many left over  from this quilt of Siblings Together Bee 4. (For more on this wonderful charity see the tab above).

17A6357B-E6B3-4001-AE3A-5360F9BF19F8 I picked out blue and green ones and they became the centre of a medallion quilt. It struck me that rather than randomly make blocks for the next layer I needed to think about size and dimension and make to order.
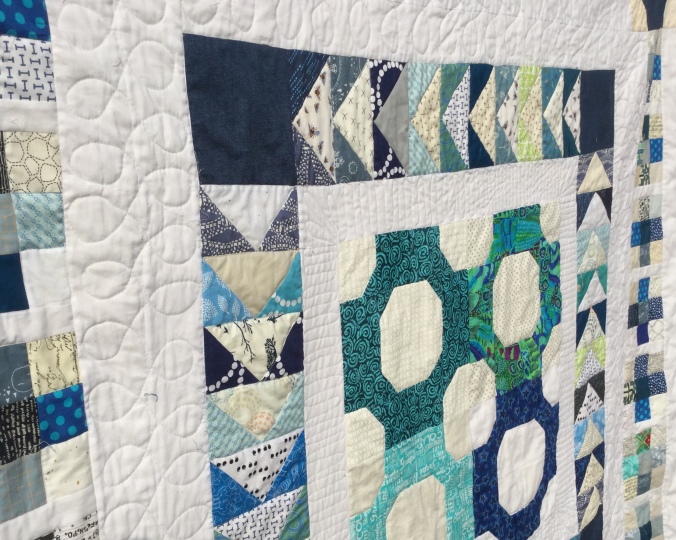
Out came the graph paper and pencil and on the basis that the centre measured 24” by 24” I decided if the blocks were either 3” or multiples of 3” then I couldn’t go wrong. Well that was an ambitious thought but with much reworking and playing with sizes I got to a workable design. Of course the complication is the significant difference between the size you have to cut versus the finished size  allowing for seams.

12A1BC30-8F03-46E7-85F1-0F97B5AA54BD.jpeg

It was a fun make.  Some pleasant mindless sewing of flying geese and then the plus block.  Assembling it was a bit more nerve wracking seeing whether my maths worked or more correctly whether the assembled pieces were precisely pieced to make the required length.  Well with a bit of tugging we got there. So thanks to the ladies of ST Bee 4 for their patience in using their blocks and special thanks to a Helen @themagpiecat who kindly offered to make two corner units,  it got done.

6CF7F62A-2833-418E-A3F1-29C77E1F2FF6

I decided that it called for some free motion quilting.  It was time consuming not so much doing the negative space but stitching in the ditch of all the pieced units. Took me hours and hours. It helped having this sawn off ankle!  I’d seen on Karin’s blog  The Quilt Yarn  about a modified ankle which made visibility better. This is for the Pfaff 4.2 QE. in effect as you can see from the pictures it cuts off the bit to which you attach the foot which isn’t needed when FMQing. Not the cheapest of ankles as it had to come from the US  but worth it. You can see in the second picture how much the normal ankle obscures things when you are quilting backwards.

39B3A9AE-473F-4115-9C0E-E936E16A18DD7A65E1CE-02CD-4E2C-A30B-65AD16EA1A1E


So another quilt towards the 100 we need this year. Every quilt counts.

7F82545C-D847-431A-8F65-723DA8FCC483

This is a Q1 FAL finish first blogged here.

Linking up with Kelly of My Quilt Infatuation and Amanda Jean of Crazy Mom Quilts 

Breaking out the Outback Wife

IMG_7185

For those who read this post without background knowledge of quilting fabrics then the title must be mystifying if not, on humanitarian grounds, potentially alarming!  But for those who do follow fabric then you will know that this is a fabric range called Outback Wife in bark cloth by the Australian designer Gertrude Made inspired  by women she met in the Outback  (quite literally – this one is called Kirsten). That of itself isn’t unusual, fabric designers take inspiration where they can find it, but what was more unique was shamelessly going for a vintage feel in using bark cloth and some beautiful and unusual designs in a large print florals.

It got a lot of attention and despite the eye watering price at £27 per metre it caught on amongst dress makers and quilters. I resisted but gave in and bought a metre decrying it was the most expensive fabric purchase of my life. So it would take a special project to make me break it out and cut it up and thanks to a Sew Along for Aneela Hoey’s book Stitched Sewing Organisers I found one. 

Continue reading

Bold and Brave Quilt

5B88887C-EAA8-48B4-964B-2C485619DF22

I am neither bold nor brave but that was the title of Kim Lapacek’s Project Quilting challenge. This is a challenge set every couple of weeks for the first couple of months of the year to make a quilt on a given theme in a week. In fairness it doesn’t have to be a quilt, just a quilted item. Nevertheless the challenge of doing it in a week rarely fits in with my life but I always check the theme as to whether it sparks anything.

An example from last year was the theme best dressed man and I chose to make this mini quilt  out of my late husband’s ties. It is hanging above me as I type.

img_5425

Three things sparked me this time. I’d seen an IG post from @mrsterritee of 3 beautiful quilts using Amanda Jean of Crazy Mom Quilts Big Nines design she had made, with the help of her Bee, for the charity Siblings Together (see tab above) .  It was a bold and graphic design perfect for an older teen/young adult. Almost immediately after, I saw a post from Jo Avery @mybearpaw of Thread House fame about Social Bite, a project for homeless people in Edinburgh. Her husband, Jonathon Avery, coming off the back of his experience of designing ‘tiny houses’ has developed a two person dwelling and a number of them are being built on donated land to help transition people without homes into eventually permanent housing.  If you a key player in this initiative  and you are married to one of the country’s best known quilters then you can bet your bottom dollar that quilts will  be found in these houses. To that end Jo was asking for quilt donations. So my bold and brave quilt was born, bold because I chose bright, bold colours (quite the change for me) and brave doing a quilt in a week with a fairly full schedule.

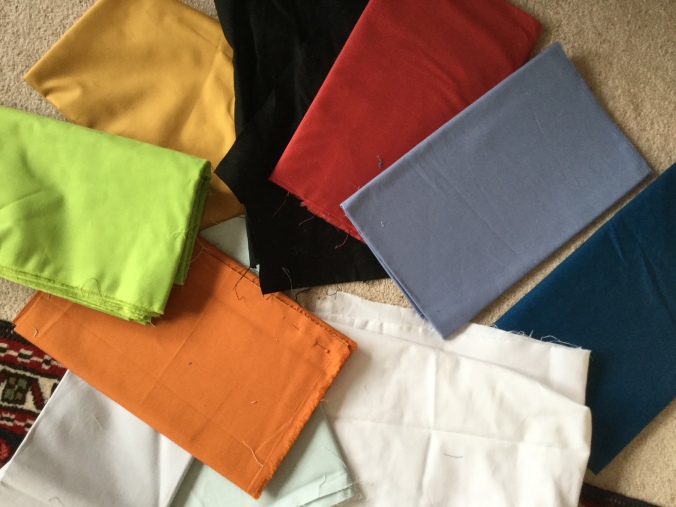
Well I think both paid off.  I grabbed my teens before they headed off to school to advise me on colours from my solids. This was going to be my first ever solids only quilt. So I was left with these….. a quick trip to The Cotton Patch my local quilting shop to gather more quantities of the colours we had chosen and I was away….

B69B95A4-7D0B-4584-86C2-3FB9D2A739CC

It is a quick and easy design. Lots of chain piecing and so perfect for  giving Winnie, our new addition to my sewing family,  a workout.

F8693B37-48DB-4E6B-A00C-B98052C9326F

In fact aside from the quilting, which given its size and the tiny throat of the Featherweight wasn’t practical, everything was sewn on Winnie. It was a good learning experience.  The spool doesn’t hold masses so that had to be redone a number of times.  The tension went wonky and I then realised I hadn’t threaded the bobbin correctly  and so on. The seam guide above was excellent for accuracy as I’d found without it the very silky surface of the machine allowed a lot of movement as you sewed. The  honeymoon isn’t over yet….

While the blocks were done in a day, as we all know, deciding on the layout of the top, sewing the top, then basting, quilting and binding can take up at least as long.  I sewed into the nights as you can see in this picture…

4AD809FF-27E7-472C-B994-4802A2C36C01

And I won’t say how long I sewed into the early hours to get the bulk of the binding done. Of course the house is a mess and I’m not sure my children will have enough clean clothes for the weekend but it’s done. Sigh. Not sure I will be racing to do this again!

But I’m pleased with it and its big enough at 80″ long for a tall person.  I found working with solids in some ways quite straightforward but they are unforgiving, no pattern to disguise a less than perfect wonky seam. Having had a fling with AGF’s Pure Elements as a solid I have rather gone back to more conventional, less fine woven Kona and Makower solids.  They have more give and don’t crinkle as much.

The pictures were taken in my parents London garden. They have this lovely brick wall but no way of securing it but its a wonderful backdrop. If the wall lived with me I’d rig something up but on a cold windy February afternoon the quilt being draped over the wall had to do, just prior to falling to the floor!

F5031613-5CA3-4B2F-98C3-FA14DA3578F2

The quilt was too big even for my 6’ Dad to hold unaided so we roped in the neighbour’s fence as well. Typically just as we put up the quilt the wind picked up and you can see the over sized peg flying off.

64D747F0-212C-4E4C-82FF-1D0F721E54DC

I hope it fits the bill and provides someone with warmth as they start on the next phase of  a more settled and happier chapter of their lives. I’m looking forward to more updates as this project progresses.

Linking up with Amanda Jean Crazy Mom Quilts and Kelly of My Quilt Infatuation


A new addition to the family

No not a new baby……heaven forfend…. my new addition is this beautiful Singer Featherweight which I found on EBay and went to collect last week.

DE51AD8E-C3F8-4479-B865-2CA4F89BB87A

I have to say, casting back four years, I would have been utterly horrified at this purchase. Why have something so old when you have perfectly decent modern machines with all their gadgetry. But you know how these things gradually creep under your skin and your opinions start to change as you see other people sew on them and appear delighted with their ancient sewing machines and their performance.

A couple of years back I had the opportunity of having this sewing machine which had been long disused in my mother in law’s house having belonged to her mother-in-law. I was tempted but what  put me off was that it was handcranked and you must believe me I need every hand going to ensure accurate seams!  It was also incredibly heavy and bulky and I could just see it being abandoned as it had been by my mother-in-law. If I change my mind it’s still in my sister in-law’s garage.

B7EEFA2E-EA9F-4F1B-AAF1-82E0016FF73C2B15539D-F015-448E-ACBF-4C4C0AC85227


Having done some research and deciding that something neat, compact and light was what I wanted the obvious choice was the Singer Featherweight. Tens of thousands of these were produced both in the UK and America between 1933 and 1960s and proved very  popular. So they are not rare or hard to come by, particularly this 221K model. There is a more rare 222K which has the benefit of being able to remove the base so that you’ve got a free arm. But essentially they are both the same straightforward mechanical straight stitch machines. Just perfect for piecing.

But in finding one there  are the horror stories of these machines being bought on spec on places like EBay then failing to function very well.  I have absolutely zero ability in anything mechanical. I need things that work first time with no hassle. The general advice was to find a knowledgeable dealer and with a bit of poking around on EBay  I found a seller who, based on his history of many happy buyers of vintage machines, particularly the Featherweight, clearly made restoring sewing machines his job. So for a premium on the price, which I was very happy to pay and in reality wasn’t actually that much, I got a machine that had been fully restored, serviced, new belt, new electrics and LED light.  I wanted the confidence that I wasn’t going to get something which caused hassle and was tricky to use.

I didn’t want to risk it being delivered by a carrier and the vagaries of their handling and he was near enough in the East Midlands to collect it in person. Having seen Philip’s set up I was even more confident.  He obviously loves these machines and takes pride in his workmanship. Of course Winnie (yes she has a name) has scratches and marks but she will have a load more after I have been sewing on her as she is definitely not for show. She will be regularly used and if that means she gets battered and scratched then so be it.

The children were much intrigued by this new acquisition.  There was general agreement it smelled.  I think that’s the case in which it has probably long resided and the cases are notoriously smelly. Apparently something to do with the glue used. Someone on IG suggested putting some tumbler sheets  inside the case and that’s worked well.  It’s smaller than I’d imagined and almost looks like a toy machine. The apple in the picture gives it scale.

B34FFEC0-9601-41B0-8CD6-78AAE4D24B96

The thing that really amused me was their surprise that it had a motor and plug. I explained at 66 years young she was only a few years older than me. My children genuinely thought that electricity was relatively recent. Well obviously both their schooling and I have failed in their education!

Thanks to some excellent videos on the basics of the machine on the Singer-Featherweight.com website by the delightful 12 year old Ruthie, daughter of the owners, I was up and running in no time. I tell you her video presentation skills put to shame many quilters who post on YouTube during which viewings you might just well lose the will to live! Excepting of course the wonderful Jenny Doan of MQC. Back to the  machine it sews beautifully and so quietly.  I’m rather smitten.

So what have I made with it? Well I did some trial blocks and I noticed that the wonderfully silky smooth finish of the sewing machine meant getting my seam allowance more difficult  I need to work on that but other than that it is, because it’s so basic, easy to sew on. I sewed quite a few curved blocks for a new project

I had every intention of finishing off this sampler pouch of all the blocks I made at the Thread House Retreat last week using the Featherweight. The log burner was lit and after lunch I was settling in for a lazy Sunday afternoon sewing in the lounge when one of the children came down, snuggled up on sofa with a quilt and fell asleep. Well the Featherweight is quiet but not that quiet so I had to use the conventional machines upstairs. Best laid plans….

03909D14-87BA-4502-A529-BE44410232949F0F0A63-ECD5-4EB9-863F-05F72CD9BAD5

I cobbled the idea from one or two others who used their blocks in a similar way. I used Jo Avery’s pattern for her tendrils pouch  but made it slightly larger to accommodate the blocks particularly the kettle. It makes a large pouch perfect for all the sewing paraphernalia you need when sewing from home

I free motion quilted the words which with the help of a light box to trace the letters and then with slow steady sewing it came out alright

B05B23D7-B1E7-4536-96F2-B6DDE18B98C7

I cheated and used a lino cut of a cat I made at last year’s retreat for an extra block.  As you can see despite Karen Lewis’ excellent teaching I haven’t quite mastered  the art of consistent lino printing…

38C48632-B9A5-479C-A273-BA3A68098562

The Thread House Retreat Bee for Siblings Together

Welcome to the Thread House Retreat Bee  for Siblings Together.  It was great to meet everyone at the Thread House Retreat and thank you for offering to be part of this Bee! Didn’t we have a great time. Still enjoying all the IG posts of what everyone made or received.

We had such a great response to the appeal we have enough for a new Bee. I’m hoping we may go up to 12 but at the moment we have around 10 as I haven’t heard back from everyone  But to tap into the enthusiasm that is out there I thought we’d get started on making blocks while I make the finishing touches to the rota for this year, in practice until July 2018. I’ve chosen a design that is’nt that block intensive so we should be able to pull this one off together quite quickly.

image

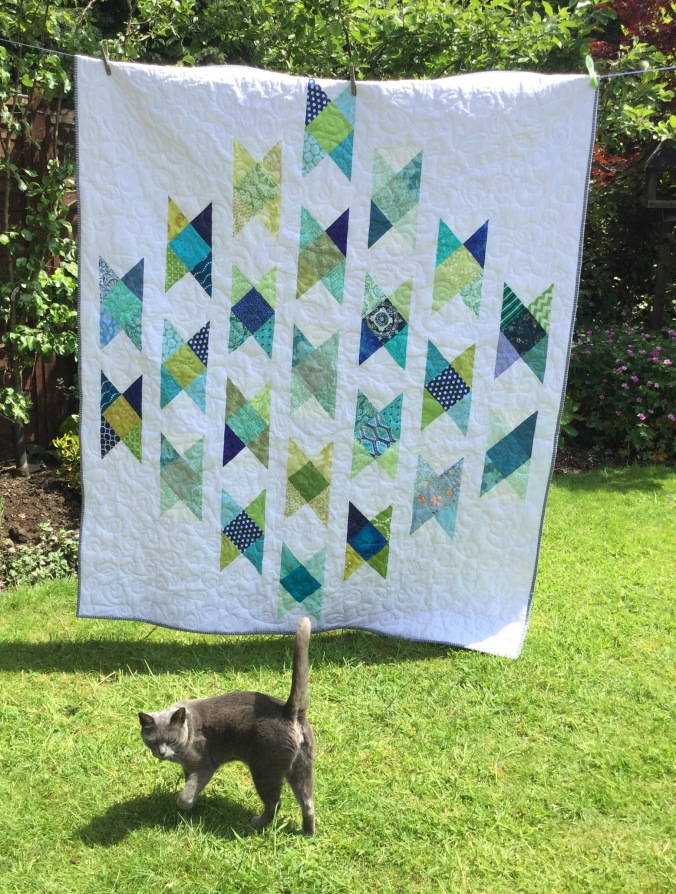
So one of the favourite quilts I’ve ever made is this beauty – my first Siblings Together quilt as a monthly mama with Bee 2. There are over 50 fabrics in that quilt. And that’s the magic behind most of our bee quilts, the sheer variety. I don’t normally repeat quilts but this is such a lovely design and I fancied doing it in warm colours this time.

IMG_6706

The pattern is a free one from Cloud 9 fabrics called Field Crossing. Heaven knows why it’s called that but nevertheless the rectangular block shape is a bit different but still a very simple and a quick block with virtually no waste. Apologies for the fact that starting squares are down to eighths”! I did try rounding them up to whole inch squares but there was a lot more trimming – it seems 1/8″ makes more of a difference than you’d think!! But after that it’s pretty straightforward.

As I’ve said I would like warm colours like orange, mustard, plum, terracotta, pink etc please mix it up. And with the background, solid white only preferably a bright white. I found using a full 1/4″ seam was better than a scant one.

To make two blocks you will need the following:

In solid bright white (not cream, fawn etc)

           1 x 6 7/8ths” square cut diagonally and then cut again diagonally to make  4  triangles

In warm colours solids or prints in orange, plum, pink, mustard, terracotta or warm brown

4 x 4 7/8ths” squares cut from 4 different prints or solids  and then cut diagonally to make 2 triangles per square

2 x 4 1/2” squares


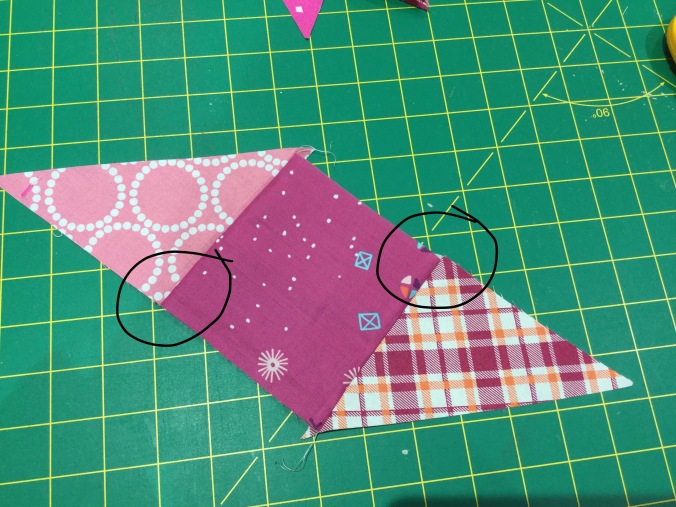
For the angley challenged like myself I found it really helpful to lay the block out as below then stitch accordingly.

IMG_6701

When sewing the seams line up the pieces where I’ve circled  don’t worry about the dog ears at each end

4FC1063F-B4AD-4581-A613-00287CBB5ED9

Next layout the other triangles and sew the white triangle to the coloured triangle

IMG_6703

When sewing the white and coloured triangle units to the middle unit line up the seams where I have circled

92ADF57D-39F9-4355-BD7C-0381D56C955A

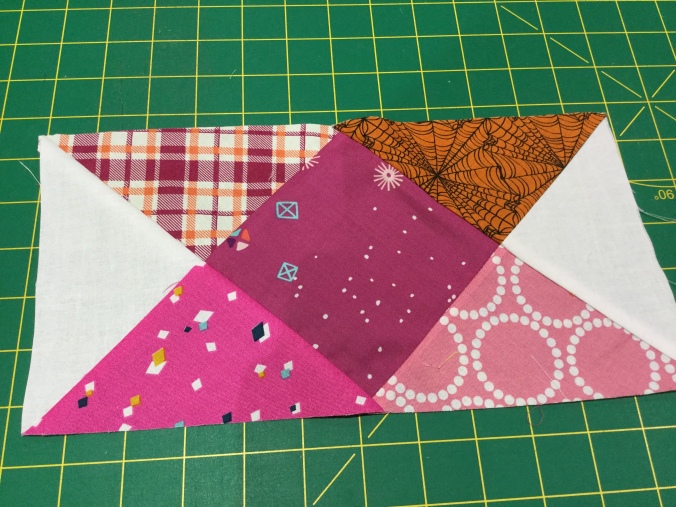
The finished block trimmed

IMG_6705The finished blocks are a smidgeon over 6″ by 11 3/4″. But don’t worry too much – they will be sashed as you can see from the pattern.

If you could make 2 – 4 blocks I would be very grateful. If you get into the swing then extra blocks are always useful and if I get enough I will make another quilt

Any problems or glaring issues or just a better way to do it please let me know. I’m not a sensitive soul!! But most importantly have fun.