Butterfly bag

img_4869

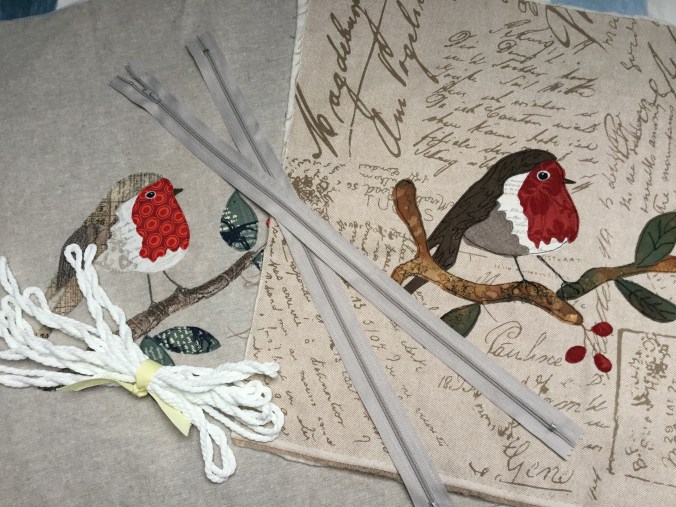
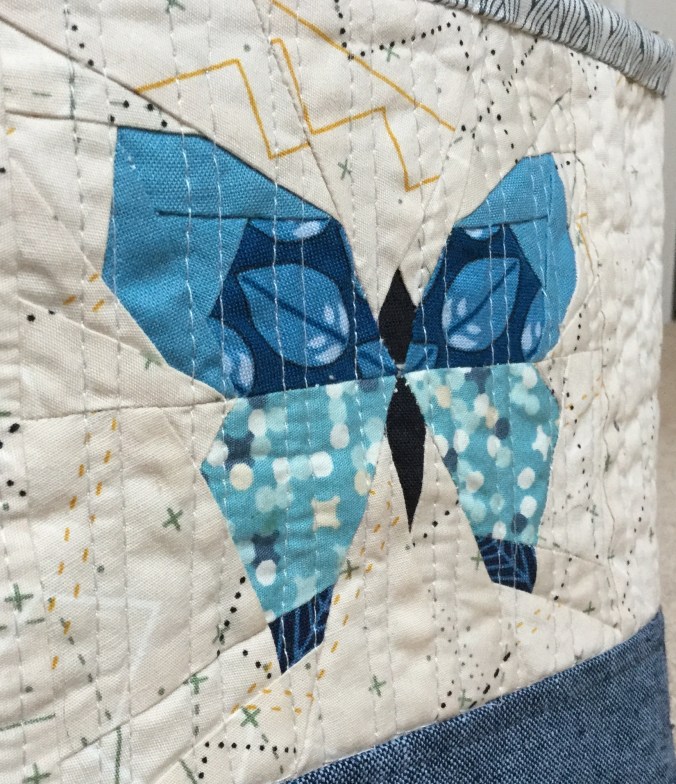
There is some great free stuff out there on the internet and one paper piecing  pattern that seems to crop up all over the place are the butterfly patterns of Lilleyella.  And why not, they are very effective and reasonably easy to make. Cath of Wombat Quilts has done a whole swarm of butterflies using liberty fabrics and they are stunning.  So never one to ignore a creative trend I ran off the pattern and set to. They only use scraps and I have plenty of those.  In fact whilst, as always, I agonised over the fabric choices it’s such a pretty design I think getting the fabrics wrong would be quite a challenge.

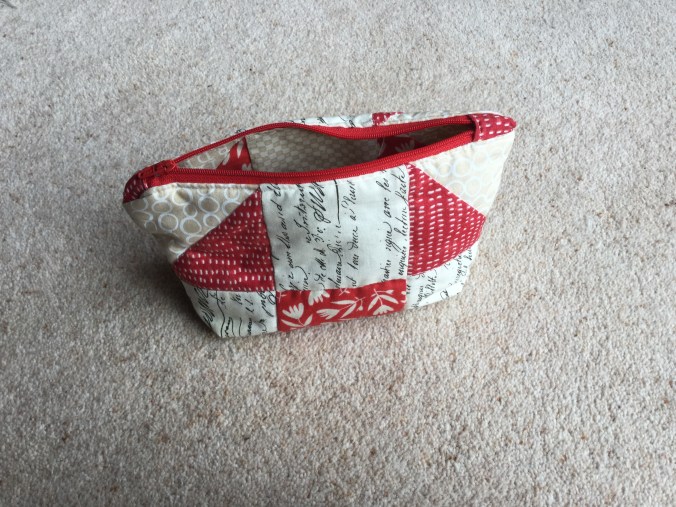
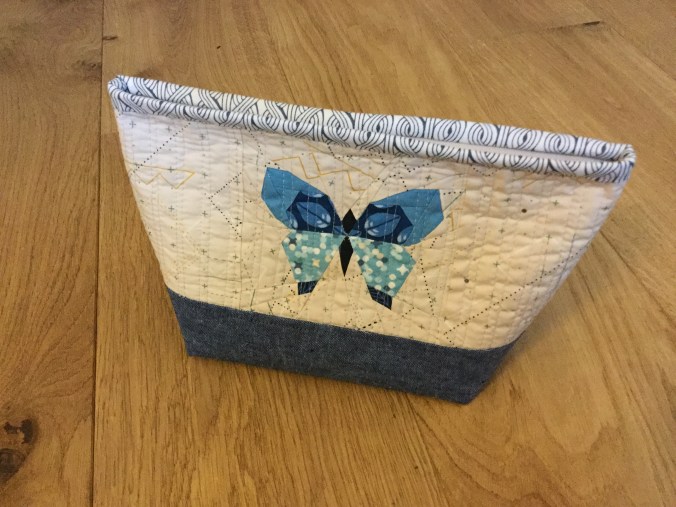
Then what to do with the resulting 5.5″ block. I’d had for sometime the Lola Pouch pattern from Svetlana of  SOTAK Handmade. Svetlana  is a seriously capable and prolific designer specialising  in bags and pouches and clearly has that sort of mind that can think in 3D construction terms. It reminded me of when I was invigilating a test for would be toolmaker apprentices back in my Personnel Graduate Trainee days and thought I would while away the time by taking the test. There I sat with my ‘A’ levels and a degree to find I could barely get to question 3 while the 15 year old lads (no girls, this was Yorkshire in the 80’s) romped through the questions. It was a very powerful lesson that ability and intelligence comes in many forms, many  of which I don’t have.

img_4867

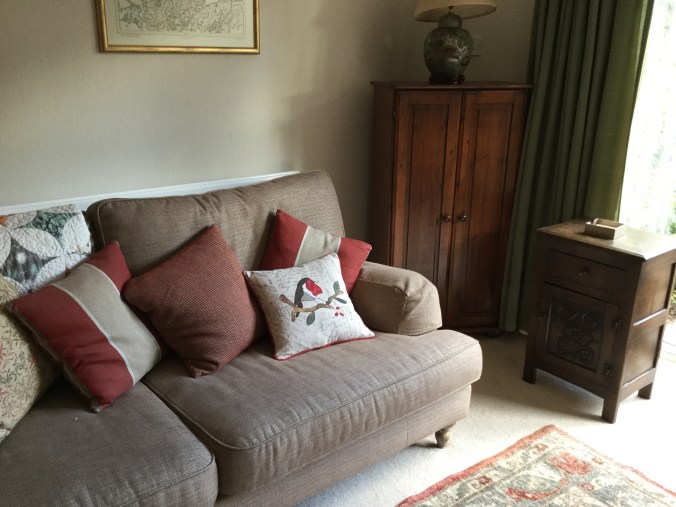
Fortunately the instructions were a great deal easier to follow than that test. Svetlana’s reputation for thorough and detailed instructions with plenty of pictures is well deserved.  I’ve made many zip pouches in the past but this one, with the binding along the top whilst it takes longer, it does make it special and I think in future this will be my go-to pouch. By the way Svetlana is having a Black Friday sale for all her patterns.

Now the techy bit. As I use my blog as a record of what I’ve made and how I’ve made it so that I can revisit the details if I need to here are the measurements. Switch off now if that’s not going to float your boat! Svetlana has two sizes of bags one small and yes you guessed it one large. Needless to say I wanted to make a middle sized version so I cut the pieces 11 x 5 and 11 x 3.75.  Looking at it critically I think it’s still a bit too big for my purposes. Next time I will shave off a further half an inch for each piece depth wise and 2 inches length wise.  Again looking at it critically although I used lightweight interfacing on the exterior pieces and fusible fleece 630 Vilene it could still be a bit sturdier . I think I will use Vilene 640 next time. The quilting does give it a bit of extra structure and hides the seams that you inevitably get with paper piecing.

img_4866


Linking up to

Crazy Mom Quilts,

Elm Street Quilts,

BusyHandQuilt ,

TGIFF 

Cloudburst


img_4848

My children would be the first to say my grasp of popular music is non existent so I was immediately out of my depth when I found out the Modern Group of the UK’s Quilters Guild was setting a challenge to produce a quilt based on a track (or two) of contemporary music. Now when I say contemporary I don’t mean in the hear and now but over the last 30 years or so. As an aside it amuses me no end that my teenagers are listening and  dancing to the same music I was nearly 40 years ago and much to their irritation I never hesitate to tell them so!! Anyway back to the challenge, it’s linked to music from Manchester which was the UK’s cotton city and is the theme of the display area the Modern Quilt Group have been given at next year’s Festival of Quilts.

I always enjoy these  challenges, subject matter aside, as they are for minis so very doable and you have a lot of  freedom regarding design, technique and  fabric. This year’s challenge quilts were on display at the South West Quilt Show in Bristol last weekend. The theme was black and white and one other (colour). My two quilts are blogged here and here.

img_4776

So my choices were to produce a 24″ square quilt interpreting either Oasis’ Cloudburst or the song Swoon by the Chemical Brothers.  You choose the band name or the song title.

Well for a start although I had heard of the band Oasis everything else was a completely closed book to me. But the song Cloudburst offered lots of creative opportunities so I decided to focus on raindrops. My original plan was to make improv curved raindrops and I made a couple but they didn’t lie very flat and they didn’t inspire me.

img_4631

The curves were very tight and they were quite tricky to construct.

IMG_4461.JPG

So still wanting to do raindrops I decided on using the ‘six minute circle technique’. This is a great technique for sewing pieced curves using freezer paper. There are some great tutorials on this if you google it. Mind you 6 minutes is a very optimistic time….. I used the technique for this quilt.

img_2776

And these blocks…

img_4734

Having multiple  layers made it a bit more tricky but I was inspired by Hillary at Entropy Always Wins one of the most innovative quilters out there who has been using multi layered shapes to great effect. In fact they  didn’t take long to make and insert them using the same technique into the background fabric.

img_4735img_4737

And then the quilting, oh the quilting, what a complete pain. I had doubled up the wadding so that the quilting would give it texture and to make the raindrops stand out almost like trupunto. I did tight spirals to reduce the volume of the background and give the impression of movement. But the constant thread breakages and skipped stitches….. I tried everything, changing from my favourite 70/80 top stitch needle to 90, then even down to 60. Needless to say that needle didn’t last long! I cleaned the bobbin area countless times, rethreaded over and over again, re wound bobbins etc etc. But we limped there….but my faithful friend is going in for a long overdue service…

img_4769

img_4853

In keeping with the stark design I decided to face the quilt and not bind it. This was a first for me or perhaps I should say it would have been a first because I completely forgot when I cut the quilt to size that I would need it to be larger than the finished size to allow for the seam. Having been very gently chided, quite correctly, for the fact that one of the quilts I’d submitted was over an inch too small against the required size  I was paranoid about getting it right…. so cut precisely to 24″ and then when I came to do the facing I realised that it wouldn’t work. But there’s always next time. But to give the effect of facing I used the same fabric as the background as a binding.

But one first for me I did succeed with doing was blocking this quilt. The too small quilt irritated me because it didn’t lie flat.  I wouldn’t bother blocking a bed quilt as the odd wavy edge isn’t so noticeable but with a wall hanging if it doesn’t hang true then wavy edges are very noticeable and as this raindrops quilt would/could  be shown at the UK’s premiere quilt show I’m really trying hard to live up to that standard. So after doing a quick colour fast check with the background material which is a woven cotton but unbranded fabric I  bravely put the quilt in the bath…..

img_4820

…and then pinned it out. Did it work, I’m glad you asked, yes it did.  I am very pleasantly pleased with how flat it is although I’ve noticed since the binding has gone on it is a bit more out of shape. Something else to think about finessing but this one is done and will be off shortly. Someone told me you should bind with 4 exactly sized strips rather than one continuous strip.  Perhaps.

img_4846

This is one of my QAL finishes albeit I was going to do another design at that stage  I’m not sure that counts then.  This is the original  Q4 QAL  post.

Linking up with

Kelly at My Infatuation, Debbie at QuiltJournal , Sarah at Confessions of a Fabric Addict and Myra at Busy Hand Quilts Amanda Jean at Crazy Mom Quilts


The exploitation of orphans

img_4802
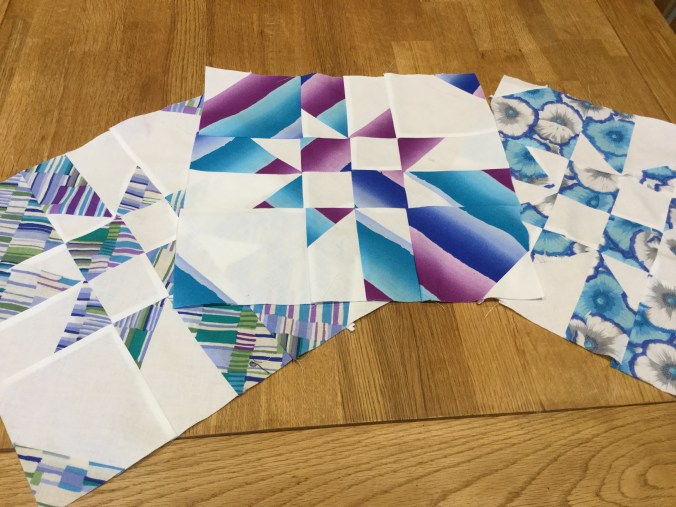
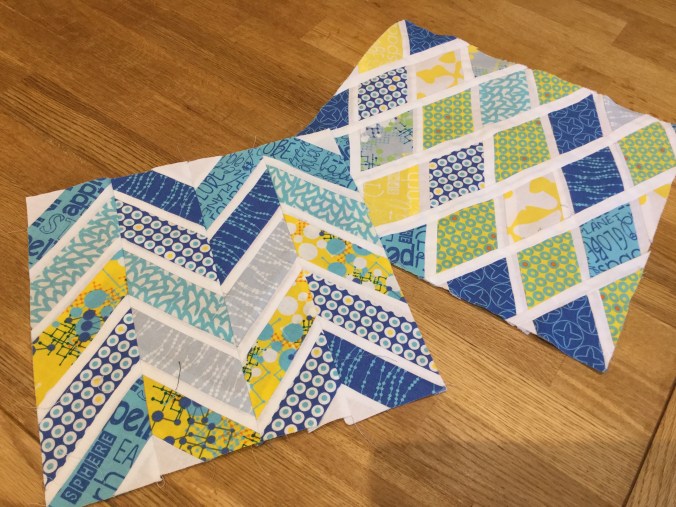
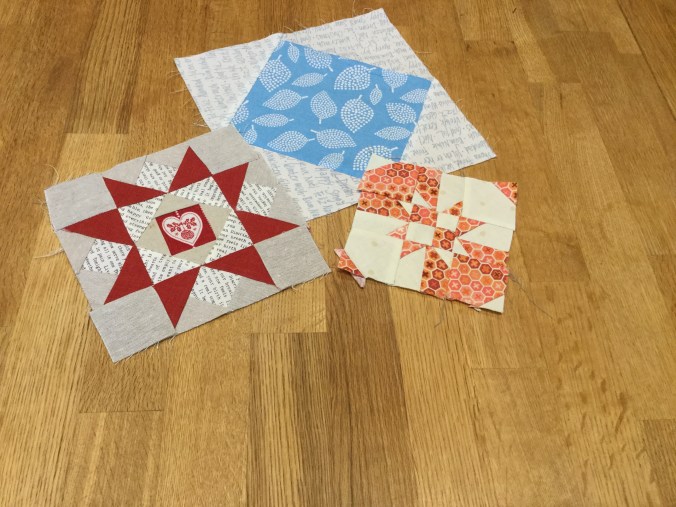
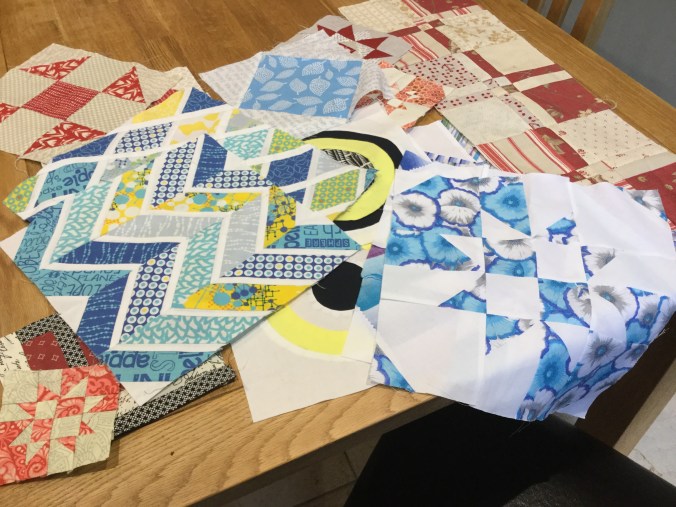
Before you think of Dickensian villains exploiting vulnerable children in the 1800s I am of course referring to the orphan blocks that I guess every quilter has tucked away in some corner. These are blocks that for a whole variety of reasons have been abandoned and left behind by luckier blocks that ended up in the quilt or whatever was being made at the time. Or perhaps they were  blocks that were never part of a family and were practice pieces  but are now all alone with no purpose other than taking up valuable space.

When I did my recent sort through my drawers of  shame I was surprised by quite how many I’d got and what a varied collection they were.  So I thought it was timely to review what you can do with orphan blocks to give them some purpose and useful function as well as hopefully being decorative in the process and then link this up to Yvonne’s and Stephanie’s (The Late Night Quilter) tips and tutorials on the Quilting Jet Girl’s  blog. I’ve found the posts in this series and in the past so useful and they have improved my quilting experience no end so I thought if you take out you should put back in!  In fact my main tip is to periodically to go through any leftover projects, large or small. I was really very pleasantly surprised when I went through my drawers of shame to find amongst some decidedly ugly ones some real gems that really do deserve being used or projects that were once put away and forgotten in the excitement of a new project but in fact are lovely and really deserve to be put back on the list. But let me introduce you to my orphan blocks and quite how I ended up with so many. Maybe these will ring a bell with you.

There are blocks that you have made to see whether you enjoyed making them and whether the pattern looked as good as you hoped. Here are some blocks from a tutorial from the Missouri Quilting Company by the wonderful Jenny Doan. It is a lovely block and it does make a great quilt but too late I realised that they were quite time consuming, lots of seams to match which I never find enjoyable and the colours were just too white for our house. So I made a few for the project before it got abandoned.

img_4808

There are trial or test blocks where you don’t ever intend to make a full quilt but just want to play. There are quite a few like this in my collection. The bright yellow ones are the Kona colour of the year Highlight and were for an IG challenge which I never got to participate in because I forgot to tag it the way you should do!

img_4804

There are mistake blocks. The picture below shows a tear in the block when I used a seam ripper to remove the papers from the back of this log cabin. Not a tip I would offer up!!! And the blue block at the back made too small for a charity bee.

There are other blocks that never quite made the grade when it came to assembling the final quilt. Maybe like the red and cream ones below that were just not going to be pointy enough!

img_4805

So what to do. Well here is an open ended list and by that I mean add your own ideas!!

1. Make a pouch. Most blocks are a size which would make a perfect pouch and if you have got a couple spare like the red and cream ones above then it’s a quick job to make up a pouch. It saves having to cut awkward sized pieces out of a fat quarter or half meter which I always hate doing and the finished product looks I think very effective.

img_4816

2. Make a needle case like the wonderful stitchy pies, which is a very creative and useful needle case by the talented Lucy Brennan. One for me and one for a quilty friend.

img_3519

3. Mug rugs/ quilted mats/pot holders  are perfect for leftover orphan blocks. I used my accidentally torn block to make a rug mug and it’s in daily use. I also used it to test out spiral quilting for this block and then discovered that I  didn’t like it for the finished quilt so it was doubly useful.

img_4817

4. Quilt backs. The obvious solution to  excess blocks. And there are some beautiful quilt backs out there that use the extras to make a creative pieced backing. On my first drunkards path quilt there were a great number of poorly pieced curved blocks which had no chance of matching up so they got used on the back and really adds to the final finish.

img_1233

6. Cushion covers. Cushion covers would be perfect to use for these blocks and I have thought of doing that but it would have been for one of my son’s rooms and I know exactly where that cushion would end up just adding to the already overly cluttered floor. But this lovely little star block in the bottom picture is one that I pattern tested for Esther could easily become a Christmas cushion.

img_4812

img_4813

8. Use to brighten up something boring! I use these cheap canvas tote bags for all my wips. It was just fun to quickly add something to make it more interesting.

img_4811

9. Charity blocks. I know our local Project Linus Cordinator happily receives any orphan blocks to make up quilts for this excellent cause. Alison at Little Island quilting does the same and she has made dozens of beautiful quilts for orphanages and children’s homes across the world.

10. Bin them! Or in my case put them into pillows for dogs at our local dogs home. This will only to apply to the most ugly or truly failed blocks like these…. actually the photo has been kind to them, they are really ugly….

img_4806

There are countless ways of using these leftover blocks please do tell what what you’ve done with yours.

Under the influence.

img_4721

I had absolutely no intention of doing any Christmas sewing this year despite having bought some lovely Christmas themed Scandi fabric to make placemats at least 2 1/2 years ago. But I hadn’t reckoned on coming under the influence of a group of virtual Instagram friends who suggested a Christmas cushion sew along. I have never felt the urge to have a Christmas cushion nor thought that my Christmases have been  compromised by not having a themed cushion to lean against, but caught up in the excitement I found myself signing up for the sew along and that long stashed fabric being brought out of its slumber. I quickly made up a curved pieced top from the Scandi fabric which you can see below……

img_4602

….but with my butterfly approach rather than finish that one I couldn’t resist making a couple more which jumped the queue for finishing…  I changed tack and instead of piecing I once again using Lara Buccella’s appliqué technique from her book  Crafted Appliqué book to make that classic, cliched perhaps, Christmas robin. Lara’s technique is  easy and effective and is now my go to method for appliqué. No more lightweight fusible fabric for me thank heavens. My iron is very grateful…

So an evening’s  work produced these legless robins.  In fact as you can see from the picture below there are in fact two robins. Having cut out the necessary template pieces to do the first more traditional robin it was really easy to use modern fabrics to come up with a more contemporary version.My Dad asked whether being legless was them getting into the Christmas spirit? And maybe these robins were  under the influence as well!!


Well with a bit of free motion quilting which was quick and simple these tops were finished and with the piping and zips obtained we were away.

img_4713

It took a fair bit longer to do the backing, the zip and the piping than I anticipated. I used as an excellent tutorial on the Village Haberdashery website.  I was extra careful as I was doing it for the first time and wanted it to look reasonably professional as this cushion is going to be gifted. Or is it? It looks so good on our sofa I think it’s going to be hard to part with. I may have to make a third robin cushion top!

img_4723


Linking to

Kelly at My Quilt Infatuation

Amanda Jean at Crazy Mom Quilts

Myra at Finished or Not Friday