A design wall at last

I’ve long envied quilters with large expansive  design walls. They are so useful for holding blocks in process, great for trying out different designs and colour combinations and they give a quilter’s sewing room, well, the proper look.

But with rooms given over to the children and general living coupled with wall mounted radiators I don’t have a nice spare wall. But it did strike me that maybe I could squeeze In half a design wall….

Utilising a quilt that was neither fish nor fowl in that it was an odd size, rather stiff from lots of quilting and hadn’t really found a home it could double up as a large wallhanging and then on the reverse, with the addition of gridded flannel it could be a design wall!

It was a simple job of inserting a 6mm pole into the binding channel which is a tip I picked up from Barbara over at Cat Patches (quite the funniest blog around)

img_5146

and then sewed on the grey flannel. In fact with the benefit of hindsight I should have reversed the process.

img_5143

Anyway here it is up as a wallhanging…

img_5150

And a quick turn round – a design wall, at last!

img_5153


Linking up with Crazy Mom Quilts and Quokka Quilts/TGIFF

2017 -plans and thoughts


img_5122

Yvonne of Quilting Jet Girl is running a link up for 2017 plans and I thought it would be a good idea to have a go if only to give myself a good laugh at the end of the year as my ambitions sadly get frustrated by life intervening.  Anyway with a fresh year what lies ahead.

General themes

1. Participating in One Monthly Goal now run by Elm Street Quilts and the Quarterly Finish Along this year has been very useful to get me focused on tasks that need a bit of stamina and a final push. This bionic bag is a case in point. I only had a couple of days left but it just gave me the excuse to set aside other tasks to get this done in time. So they will be a definite this year.

2. I want to try and build up a small stock of completed tops. I wanted to offer up some quilts for a flat being refurbished for Syrian refugees by one of our local churches in the summer but the task of producing 4 full sized quilts in 6 weeks just wasn’t going to happen. If I’d had a few tops up my sleeve then I could have helped. I won’t quilt them as they just take up too much room.

3. There are a 101 good sewing habits I would like to adopt but inspired by Debbie of a Quilters Table post on instant sewing  there are a couple I’m really going to try and apply. Firstly try and set up a design wall, it will have to be relatively small but something to hold blocks in progress. And also spending a few minutes each sewing session to tidy away fabrics and put away tools and rulers and not allow clutter to build up on my sewing table – I can hear hysterical laughter coming from my mum here!!! This is what it can look like but at its worst and this to be fair was abnormal as I’d agreed to my daughter using the room to clear out hers when she redecorated.

image

4. I need to have a good sort through my fabric collection. I’m keeping scraps less than  fat quarter separate and they become my go to fabric for charity blocks and other smaller process like bags etc. I have plenty needless to say but I’m conscious there will be similar sized pieces in the wrong place.

Specific makes

5. I want to finish my glitter quilt in 2017. This wonderful design by Jen Kingwell makes for a beautiful quilt but it’s time consuming. I’ve done around 42 blocks but need another 25+. I’ve been a bit stalled recently but must get back into the habit of doing a couple of blocks each Saturday night as part of the Saturday night craft along hosted by Lucy of Charm About You.

img_4643

6.  Whilst I have had quilts at shows as part of a Modern Quilt display under the auspices of the UK Quilters Guild actually entering a quilt into a show on a competitive basis has frankly daunted me. One of the reasons is that I’m not an accurate piecer. I get by, most of my points survive, but when I look at the precision  of quilts in shows I know I am a long way off. I’m going to try and improve and if possible muster up the courage to enter a quilt into a show.  I need to make it first and ideas are mulling around.

7. There will be more quilts for Siblings Together. This quilt I made in 2016..

img_4570I’ve again got some ideas I just need the time. There’s also a quilt top made from blocks from my Bee that needs to be quilted.

IMG_4879.JPG

8.  I would like to get on with a quilt to remind us of many happy holidays in S Africa. I have the fabric but no design ideas. Design doesn’t come easy to me, I’m a great copyist though… I just need to find the right inspiration.


Christmas finishes – only 5 days late or 361 days early…

I wanted to get these last Christmassy things finished before Christmas but  prior to the holiday  time ran away with me but it is my One Monthly Goal so I wanted to get them done. Christmas past or present they are settling into their new home!

First off is a robin wallhanging.

img_5114

img_5108


Quite simple and sweet. I used my favourite raw appliqué technique from Lara Bucella’s book Crafted Appliqué and used Vilene s320, a stiffish iron on interfacing, to give the Essex Yarn Dyed fabric a bit more substance and make it less crinkly.


The first attempt is here – forgive the awful lighting

img_5092

This was too simple and quite boring so I cut it down in size and did a flange binding, a first for  me, to add some colour and interest. It’s quite tricky  to get the inner binding an equal width and normally I’d have redone it but this was already the second time I’d bound it so as this is a quilt which will only come out once a year it will do.

And the last thing was converting this orphan block into a cushion.

img_4920

It had been rejected because the top blocks were too small. It was a very quick fix and the finished block made a great focal point for the cushion. The outer border has mitred corners and I was surprised how easy but effective these are. And in contrast to an earlier occasion this one has a bound edge and not a piped finish. I think I prefer the piped look but it’s much harder work and for a quick finish the binding works well. Whilst the design doesn’t scream Christmas it adds a festive touch.

img_5115img_5118

Linking up with Patty of Elm Street Quilts. And also Amanda Jean of Crazy Mom Quilts 

The best of 2016 and what I learnt from the not so best of the year!

img_5089

Cheryl of Meadow Mist Designs   is having a link up of the best of 2016 and it’s a great chance to look backwards at what you’ve made in 2016. Cheryl very much leaves it up to you as to how you determine what to pick as your best. However I’ve gone one step further along the line, I hope I will be forgiven, but following the example of another blogger,  Kate from Fabrikated who did a very interesting ‘hits and misses’ blog post, I’m reviewing and highlighting my makes of 2016 with a more critical eye and including some ‘not so best’ of 2016

Why am I highlighting failures? Well I’m a great believer in looking at what you’ve done with a degree of introspection, not to beat yourself  up about mistakes (I can’t emphasise that enough) or to get false reassurance but to recognise what went well and what didn’t and crucially why. It’s routine to do that in a work context and I’ve always found constructive criticism leads to a better outcome so why not apply that to what you do for pleasure so you learn and move on. So here goes…

The post with the most views and the most comments (600 and 16 respectively)

image

This quilt derived from blocks from the lovely members of the Siblings Together Bee 2 and made a stunning quilt which will now be in the hands of a child in care, used and treasured I hope. If it’s anything like my children’s quilts it will be a crumpled heap on the floor or draped across the bed or child!!

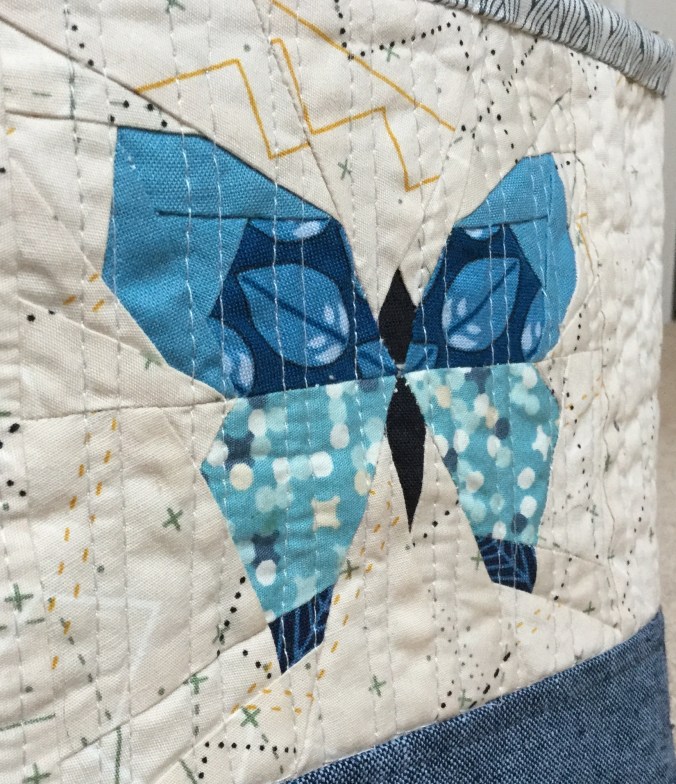
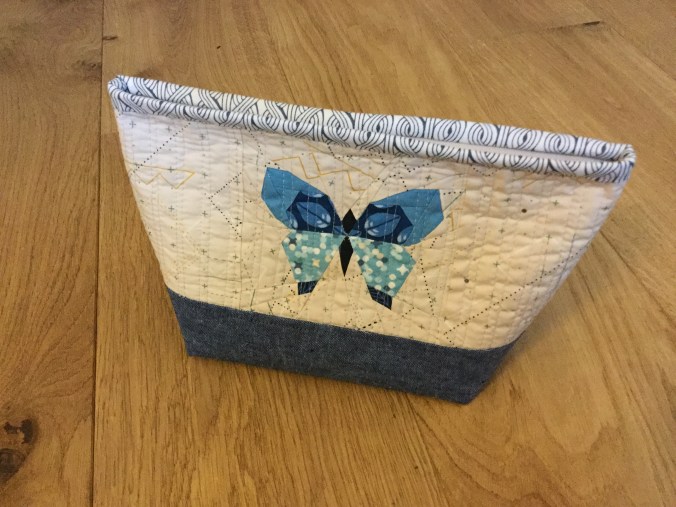
My favourite mini quilt of the year 

img_4912

This wallhanging was made for a newly decorated room and perfectly pulls the room together. I love the design and it was a quick and satisfying make.


My favourite bed quilt  of the year

A difficult one this one because there are quite a few I like for different reasons but  in terms of functionality and coziness my favourite has to be my bed quilt. A perfect example of selfish sewing! 

img_5080


However this quilt also led to….

The quilting event that caused the most drama!

You will note there is a lot of dark red in this quilt and I knew washing would need care….unfortunately despite some precautionary measures the colour from the dark red flannel backing  (yes I know that amount of red fabric was bound to cause issues!!) ran. I will do a blog post on this as I learnt loads and need to capture it before it slips from my sieve like brain. But at its worst it looked like this. The story does have a happy ending….


img_5042


My best quilt help discovered in the year

At the beginning of 2016 I decided, after 18 months of quilting, my WIPS were getting out of control. Now firstly I’m not a quilter who is a one project at a time girl, who starts and finishes that project before moving on.  I positively like having WIPS so I can work on what I fancy not what I feel compelled to. However they were beginning to pile up and taking up too much room so action was needed. I signed up for One Monthly Goal with the lovely and generous Heidi of Red Letter Quilts where you post your month’s  action and then aim to follow through and also the quarterly finish along which has been helpful  but the best tool is one recommended by ChrissieD of the app Trello. (I have tried to put a link in here but every time I do it it freezes the page!)

Chrissie’s post explains Trello better than me but it’s basically a visual list, and that’s the critical thing for me, of what projects I’ve got.  So in one glance I can see all my current WIPS.

img_5090img_5091

More importantly you can track their current progress from  embryonic idea to final photos and labelling.  I get pleasure from moving the project card along the various processes. But  you can tailor your Trello pages exactly as you want. So I’ve got Trello pages for completed projects in 2016 by quarter (the second picture) and a whole host more.  I also use Trello for other aspects of my life such as the recent house refurb.


The quilt I least like and why

image

Looking through the Window was a useful quilt in that it fulfilled a number of purposes, I loved the fabric (C&S’s Bluebird line) and I linked up to an online quilt along with Rachel of Stiched in Color. It proved the perfect practice piece for a FMQ course I was doing. But I don’t like it….the reverse facing appliqué looks ok from a distance but is lumpy close to.  The shapes have too many acute angles for the facing to lie flat. The light blue corner stone blocks in the border make it look too traditional not helped by the quilting design in the border  which again is too trad for my taste. It’s also an awkward size and it’s too small for a single bed but too stiff thanks to the dense quilting for a cosy quilt for a toddler/baby. But I do have plans for it. I’m going to back it with that gridded design wall fabric you can get and have a reversible wallhanging and design wall. Ok I’d love a full size real design wall but I sadly have no empty walls but this will be good to put up smaller block projects.

With Christmas over and that funny period of time before New Year the next task is to think about 2017…

post script

As this blog is a craft journal I’m including here a couple of composites of makes in 2016, full size quilts and minis. And also from my IG feed my make light report which is a clever programme which analyses the colours of your feed over the last year.

img_5124img_5125IMG_5148.PNG

Fabric painting

img_5075

Some good friends of ours came up to visit earlier this week and on leaving left behind their six-year-old. This was quite intentional as they had an early factory tour (a highly expensive one I might add) of the local car plant and Riley was too young unlike his elder brother. In the aim to even things out for the boys and make it fair we concocted a much prized sleepover with us and fun craft morning. It took me back to the days of organising seasonal craft sessions when mine were younger. Sadly teenage years seems to have taken that away although I noticed one of them happily joined in, just to keep Riley company of course.

But what to do. My thoughts, perhaps quite selfishly, turned on what I would like to do but would also be a creative and productive session for Riley.  I had some fabric paints, stencils and of course plenty of fabric…

Riley quickly caught on to how to paint with stencils and we had great fun painting a couple of metres of prewashed yarn-dyed Essex linen and some plain white cotton.

img_5066

After using stencils on the linen Riley wanted to go a bit Jackson Pollock with the plain white fabric. In fact some of it reminds me of Alison Glass’s handcrafted batiks! A budding fabric designer!! The plan was that he would choose his favourite designs and then I would incorporate them into a zipped pouch as a present for his mum.

I used the Lola pouch by Svetlana Sotak of  SOTAK Handmade .  I’ve used this pattern before and it’s become a firm favourite. It does take longer to make but it’s well worth it. Here’s the reverse….

img_5076

I will dream up another use for the remaining fabric.

I’ve course I couldn’t resist having a little play and conscious that I’ve got a Christmas party this weekend for which I needed a gift I thought I’d use the Labrador stencil to use in another Lola bag for the hostess whose lab Lincoln  is the love of her life so I’m hoping it will go down well.

img_5071

img_5074

It always surprises me how just a modest difference of an inch or two when cutting out the pieces to make these bags changes the shape quite significantly.  The pattern gives you a large and a small but I’ve been trying to perfect a medium-size. So forgive the navel gazing and detailed measurements.  I always think I will remember next time what the measurements should be but I never do and these will be in the hands of others so  I can’t check measurements.

Of the two I prefer the shape of the Labrador bag as I think Riley’s bag is a bit dumpy.  With the benefit of hindsight I wish I had added extra fabric to the sides to make it wider. The width of Riley’s bag is 8 1/4 inches and the Labrador bag 9 inches so hardly a huge difference. The depth of the other pieces is for 4 1/2inches  and 4 1/4 inches respectively for the upper section and 3 1/2 inches and 3 1/4 inches for the lower sections. Again not a huge difference but I prefer the more oblong Labrador bag. I also made the boxed in seam 2 1/2 inches long (on both) not 2 inches as in the pattern. I like a flatter bottom! I think next time, and there definitely will be a next time for this lovely design,  I will go with 9 1/2 inch width and 4 1/4 inch depth for the top piece and 3 1/4 inch depth for the lower piece. In terms of interfacing I used a stiff interface Vilene s320 for Riley’s bag and ordinary cotton wadding but I prefer just the fusible wadding on the Labrador bag.

Now my sister in law has a much loved Labrador perhaps I need to do another bit of fabric painting ….

Linking up Crazy Mom Quilts and TGIFF.

Santa Sacks

I had absolutely no plans to make any thing for Christmas so I am somewhat  flummoxed about quite how I’ve ended up making so much! None of it was planned but ideas descend and then I’m away.

First off was the Christmas cushion sew along  on IG led by Nicky of Mrs Sew and Sow and Helen of Archie the Wonder Dog. I did manage one cushion….

img_4721


… but one cushion was a complete fail

img_4602

And in an attempt to find it a home I made a large drawstring bag…


img_5058


Pleased with this and then armed with scraps I made a couple more …..

IMG_5061.JPG

and then the Santa sack obsession settled in. In total I think there are now 8.

img_5027


img_5025


What fed this obsession was the peace of mind containment gives.  In our household as presents get wrapped they are left under the Christmas tree usually in Christmas themed gift bags. But bags fall over, presents spill out and go astray. Prying hands delve inside to count, feel and guess what’s inside. I am always fearful of missing presents or the wrong ones ending up with the wrong family member.  But with draw string bags presents should be safely secured from inquisitive eyes and hands or parcels falling out. That’s the theory! The only problem was I needed quite a few.

They are a great stash and scrap buster. I used the lined drawstring bag tutorial from In Colour Order by Jeni Baker. To give them a bit of heft I lined them with scrap red flannel I had left over from a number of quilts I’d made.   I made my bags a fair bit  bigger at 16 – 20″ square for the base section and collars around 5″. We are not a one present per person family!

Then of course they need labels….. with a bit of free motion quilting on Yarn Dyed Linen they look a bit homespun but at least it’s clear whose is whose.

img_5035

Now it’s just a question of sorting through presents and wrapping them. With these bags to fill I’m hoping it will go with a swing until I realise that someone is looking a bit thin and I’m dashing out getting more stuff!!!

Linking up with Amanda Jean at Crazy Mom Quilts

.Linking up with Scraptastic Tuesday with Nicky and Leanne. 

A quilt for Tomas – in memory

img_1150

Today is a very sad day in our household.  The dear grandson of one of our closest family friends died in late November and today we will be at his funeral. It shouldn’t happen that a 3 year old succombs to pneumonia but despite every care this tragedy happened to this wonderful family.

Tomas genuinely was a child that lit up a room, as so often with children with Downs Sydrome he had that quality that draws people in.  And in his large and loving extended family was adored by them all. His loss is just huge for his family, please remember them in your prayers

I made Tomas this  quilt when he was beginning to learn to sign and speak and I thought an I spy quilt would be just the thing.  And indeed he loved it and would look for his favourite pictures. When I was making it, and being one of my earliest quilts oh does it have many inaccuracies and wonky quilting, thank heavens I couldn’t see ahead but just enjoyed the process of making something for a wonderful little boy

img_1151


DIY art and bonus scrap cushion!


image

After a recent and long overdue refresh and refurb of the house I had a lot of blank walls in the multiple variants of cream/off white/oatmeal that I tend to go with. Rather than just put up the old pictures it gave me the chance to evaluate whether they were worthy of a place. Some have been relegated to the charity shop, others are still being juried and some have been put back up. I will admit to quite a few quilt wallhangings of mine appearing on these blank walls but only my favourites go up, others are taking up cupboard space and may suffer the indignity of becoming a dog cushion for the local dogs home!

But in the family room, which has many uses but is mainly a space for my teens to watch TV, play games and entertain their friends I was struggling to fit in any of our pictures. Originally and pre children with its plate rail and big bay window  it had  a lovely warm, rather old fashioned feel particularly with an open fire in winter.  But this time we wanted a more modern look and shamelessly copied one of the images  in the John Lewis catalogue but I presume that is the intention of these stylists to get us to buy! Well they succeeded but the wall art in the picture wouldn’t have worked and I needed something that would tie in these blues, greys and oatmeal colours with the existing red brick fireplace. I thought it would be a wonderful excuse to make a wallhanging with the right colours and at the right size to tie the room together.


img_4780Picking colours our grey cat Minty got in on the act adding his own tone of grey. Needless to say I had plenty of bluey greys to audition and just the right brick red to go with the fireplace. As to the design I had seen Zen Chic’s latest blue fabric range online and their quilt Bowls to show it off.  It was the perfect inspiration but I didn’t want to applique the circles so used the wonderful six minute circle technique.  This technique gives you a pretty perfect pieced circle without having to sew a curve in the conventional way. I used the technique to make these recent blocks for a charity quilt.

img_4734

These come together rather magically with the help of freezer paper, starch and glue. You can of course get the same effect by making 4 drunkard path blocks but the circle is then in quadrants  and you have to match seams. This is much quicker and I think more effective.

An excellent tutorial on this technique can be found  here.

The quilt was actually a quick if rather messy make but I needed a design wall to play with the blocks. How I’d love to have a permanent design wall but to find the room I’d need to evict a child first so I made do with this improvised one draped  over an existing picture.

img_4900


The quilting is irregularly spaced straight lines using a variety of different threads. I was bold for once and put some red thread in.

img_4901img_4910

I tried a new binding method using four strips instead of one continuous binding strip.  I’ve often wondered whether the  continuous binding distorts the quilt when you go round the corner. Whilst that’s not a problem for a large quilt because when it’s draped over a bed  you’re not going to see the old wave but with a wall hanging I do like them to be flat against the wall. Heidi of Red Letter Quilts mentioned a tutorial she  had seen that used four  binding strips but would still give you  a mitred corner from Linda of Flourishing Palms.  I also came across a video tutorial of this technique on the Modern Quilt Guild website. I’m a member so unless you are it may not be accessible but it largely covered the same ground, it’s just good to see some of detail explained. The tutorial is here and having used it I think practice would help make it more perfect  but my overall feeling is it does help to ensure a flatter finish because each binding strip is measured precisely against each side of the quilt.

As always I ended up with another whole bunch of scraps from doing this quilt because the circle method means you are cutting out, surprise, surprise  circles. Not wishing to put them back into my scrap system and knowing that the room needed cushions I couldn’t resist doing a quick scrap cushion in the same colour way. Rather than piece this into the background it’s appliquéd on which I’m not so sure is as attractive but to make up for that I thought I would pad the circle and I’m afraid it now looks rather like a multicoloured polo mint. But as it will spend much of its life on the floor knowing my children it will have a limited life span…..

img_4983

image


I have to say I’m really pleased with the wall hanging and the children are reasonably OK with it although not effusive!! I’m just grateful for all the time I’ve saved trying to find the right artwork to go above the fireplace!!

img_4912

Linking up with  Kelly of My Quilt Infatuation  , Anja for TGIFF , Amanda Jean at Crazy Mom Quilts 

Christmas and all that

I’m in denial that Christmas is 3 weeks today but will have to face up to it this week. It will inevitably squeeze out sewing but I’m determined to get some things finished ahead of Christmas. There’s at least one more of these to do as stocking fillers.

img_4918

There’s a wallhanging I want for the newly decorated but at the moment rather uncoordinated front room….

img_4901

But my One Monthly Goal for Elm Street Quilts is to turn these into Christmas cushions.


img_4664

img_4920


The robin just might end up as a wallhanging instead. It would certainly be quicker to make. I was surprised at quite how long it took to make the last robin Christmas cushion, what with the piping and inset zip. But we will have to see.

The block is a paper pieced star left over from when  I pattern tested for Esther of I patch and quilt. There’s a couple of wonky corners that need to be resewn to square up the block. But it’s too nice to waste and although it’s on the small side with borders it can be expanded.

Now I just need to remember to enjoy the ride and not fret too much about forgetting anything.


Butterfly bag

img_4869

There is some great free stuff out there on the internet and one paper piecing  pattern that seems to crop up all over the place are the butterfly patterns of Lilleyella.  And why not, they are very effective and reasonably easy to make. Cath of Wombat Quilts has done a whole swarm of butterflies using liberty fabrics and they are stunning.  So never one to ignore a creative trend I ran off the pattern and set to. They only use scraps and I have plenty of those.  In fact whilst, as always, I agonised over the fabric choices it’s such a pretty design I think getting the fabrics wrong would be quite a challenge.

Then what to do with the resulting 5.5″ block. I’d had for sometime the Lola Pouch pattern from Svetlana of  SOTAK Handmade. Svetlana  is a seriously capable and prolific designer specialising  in bags and pouches and clearly has that sort of mind that can think in 3D construction terms. It reminded me of when I was invigilating a test for would be toolmaker apprentices back in my Personnel Graduate Trainee days and thought I would while away the time by taking the test. There I sat with my ‘A’ levels and a degree to find I could barely get to question 3 while the 15 year old lads (no girls, this was Yorkshire in the 80’s) romped through the questions. It was a very powerful lesson that ability and intelligence comes in many forms, many  of which I don’t have.

img_4867

Fortunately the instructions were a great deal easier to follow than that test. Svetlana’s reputation for thorough and detailed instructions with plenty of pictures is well deserved.  I’ve made many zip pouches in the past but this one, with the binding along the top whilst it takes longer, it does make it special and I think in future this will be my go-to pouch. By the way Svetlana is having a Black Friday sale for all her patterns.

Now the techy bit. As I use my blog as a record of what I’ve made and how I’ve made it so that I can revisit the details if I need to here are the measurements. Switch off now if that’s not going to float your boat! Svetlana has two sizes of bags one small and yes you guessed it one large. Needless to say I wanted to make a middle sized version so I cut the pieces 11 x 5 and 11 x 3.75.  Looking at it critically I think it’s still a bit too big for my purposes. Next time I will shave off a further half an inch for each piece depth wise and 2 inches length wise.  Again looking at it critically although I used lightweight interfacing on the exterior pieces and fusible fleece 630 Vilene it could still be a bit sturdier . I think I will use Vilene 640 next time. The quilting does give it a bit of extra structure and hides the seams that you inevitably get with paper piecing.

img_4866


Linking up to

Crazy Mom Quilts,

Elm Street Quilts,

BusyHandQuilt ,

TGIFF